There are plenty of mice with macro functionality on the market, some very precise or with full step sequences, but none that I can find allow you to add variance and if you ask the companies or on support forums, there is a reluctance to implement such a feature. Why does this matter? Games which require constant rapid pressing or holding are a lot of wear and tear on your hands – while well designed games typically add a repeat fire method of input, some don’t, and others consider the use of macros to offload this effort to be cheating. This is why variance is not implemented as it would evade most macro detection systems, mouse makers don’t want to get their products blacklisted by the industry. Unfortunately this leaves players in a bad situation where to play, is to eventually injure – and this is the situation I found myself in recently in one particular game.
I am/was a Nikke player, I actually got rid of my original high end account a while back because of bad RNG features and power creep, but I’m still active in the scene. It’s a gacha game which has quite enjoyable gameplay with surprising depth, it feels like a game written by people who wanted to make a good game, trapped within a gacha business model cage.
There are different weapon classes, while most guns can be fired continuously by holding the control, sniper rifles and rocket launchers use a charge shot method – hold the mouse button (or keep your fingers on the screen, it was originally a phone game after all) and then release to fire. There are two problems here – firstly due to game design and the need to fire often to build up ‘burst’ energy – it turned out that fully charged shots were less optimal than spamming them as fast as possible. This meant that to compete in score based modes or beat more difficult stages, players have to repeatedly click/tap about 4 times a second since under AI control the characters with these weapons were nearly useless.
The second issue strongly related to the first, is this is an example of poor ergonomic design. I have had problems stemming from working on keyboards and mice, for many years now. At the worst point I was unable to work for 8 straight months or drive a car, this is how serious tendon/carpal/etc issues can become, and some are life long afflictions you will have to learn to manage if you want to stay employed. For a game in this day and age to encourage this kind of wear and tear on their customers hands through a lack of experience in control design, is unfortunate.
Players naturally found ways to automate the clicking – gaming mice for example. This is a gray area in the game TOS to be fair, they are broad and non-specific to the point that when asked directly, Shift Up support’s response to a question on the subject was simply that they couldn’t promise that the anti-cheat system wouldn’t get upset. Very quickly and for obvious reasons of health, comfort and performance – using macros became widespread – normalised within high level unions who provide the bulk of income.
Unfortunately, even though this was something all players could do (some methods are even free), a minority of players started to complain about the “cheating”. The loudest voices were the ones who were simply being outspent anyway and could never compete, but they’d told themselves it was due to macro use, and being idiots they believed it. The end result was a thread on the official Nikke Discord server which saw a huge amount of engagement and was naively escalated to customer services. This is where the s… really hit the fan. Statements were made, entire libraries of youtube content vanished in a moment as people protected themselves from the pointing fingers, and a number of players offered constructive suggestions about how the game could be improved while solving the problem at the same time.
The options Shift Up faced were to go with enforcement measures, balance changes (for example increase full charge damage) or control improvements. No game has ever managed to completely ban macro input, and few have tried because technically it’s impossible. Not would it be the wrong decision technically, it would be the wrong decision on any “best for business” and “best for players” level too – so that’s what they went with. They eventually rolled out a system that monitored click inputs via the ACE anti-cheat the client bundles with.
Immediately innocent people were getting warned or banned (this was later reduced to a 1 minute ban due to the constant false positives), it was possible to get banned for clicking too fast in the menu, clicking too fast in legitimate play and my personal favourite clicking too fast IN ANOTHER APPLICATION ENTIRELY while Nikke was still running in the background. The response from them as the complaints mounted was that people should not play in a way that “appeared to be like macro”. Yes really. In reality, macro became the safest way to play to ensure that you weren’t clicking too fast. It was, and still is one of the most spectacular failures of judgement and implementation I have ever seen. I don’t see as many complaints recently, so they may have toned it down.
Would they eventually ban people for having Razer tools installed? Certain mouse models? Would they measure timing consistency in future as they “improved their countermeasures”? This left people with physical difficulties completely out in the cold, it was as if they’d said “you are not allowed to play competitively anymore”. Clicking fast is not a skill, it’s just physically irresponsible. There’s so much knowledge on this subject out there and it was all being ignored in the laziest, most inept way possible.
So I decided to do something about it. If you make a macro mouse that looks like human inputs, requires no software and is actually just a modification that can be applied to nearly any “off the shelf” mouse, then there’s no possible way to stop it that won’t stop players who click manually. It would work in any game which requires this type of spam clicking, and could easily be reprogrammed to adjust speeds or even features in future.
You will need:
1) A soldering iron and solder, or just get a friend who has the skills/equipment to assemble it for you.
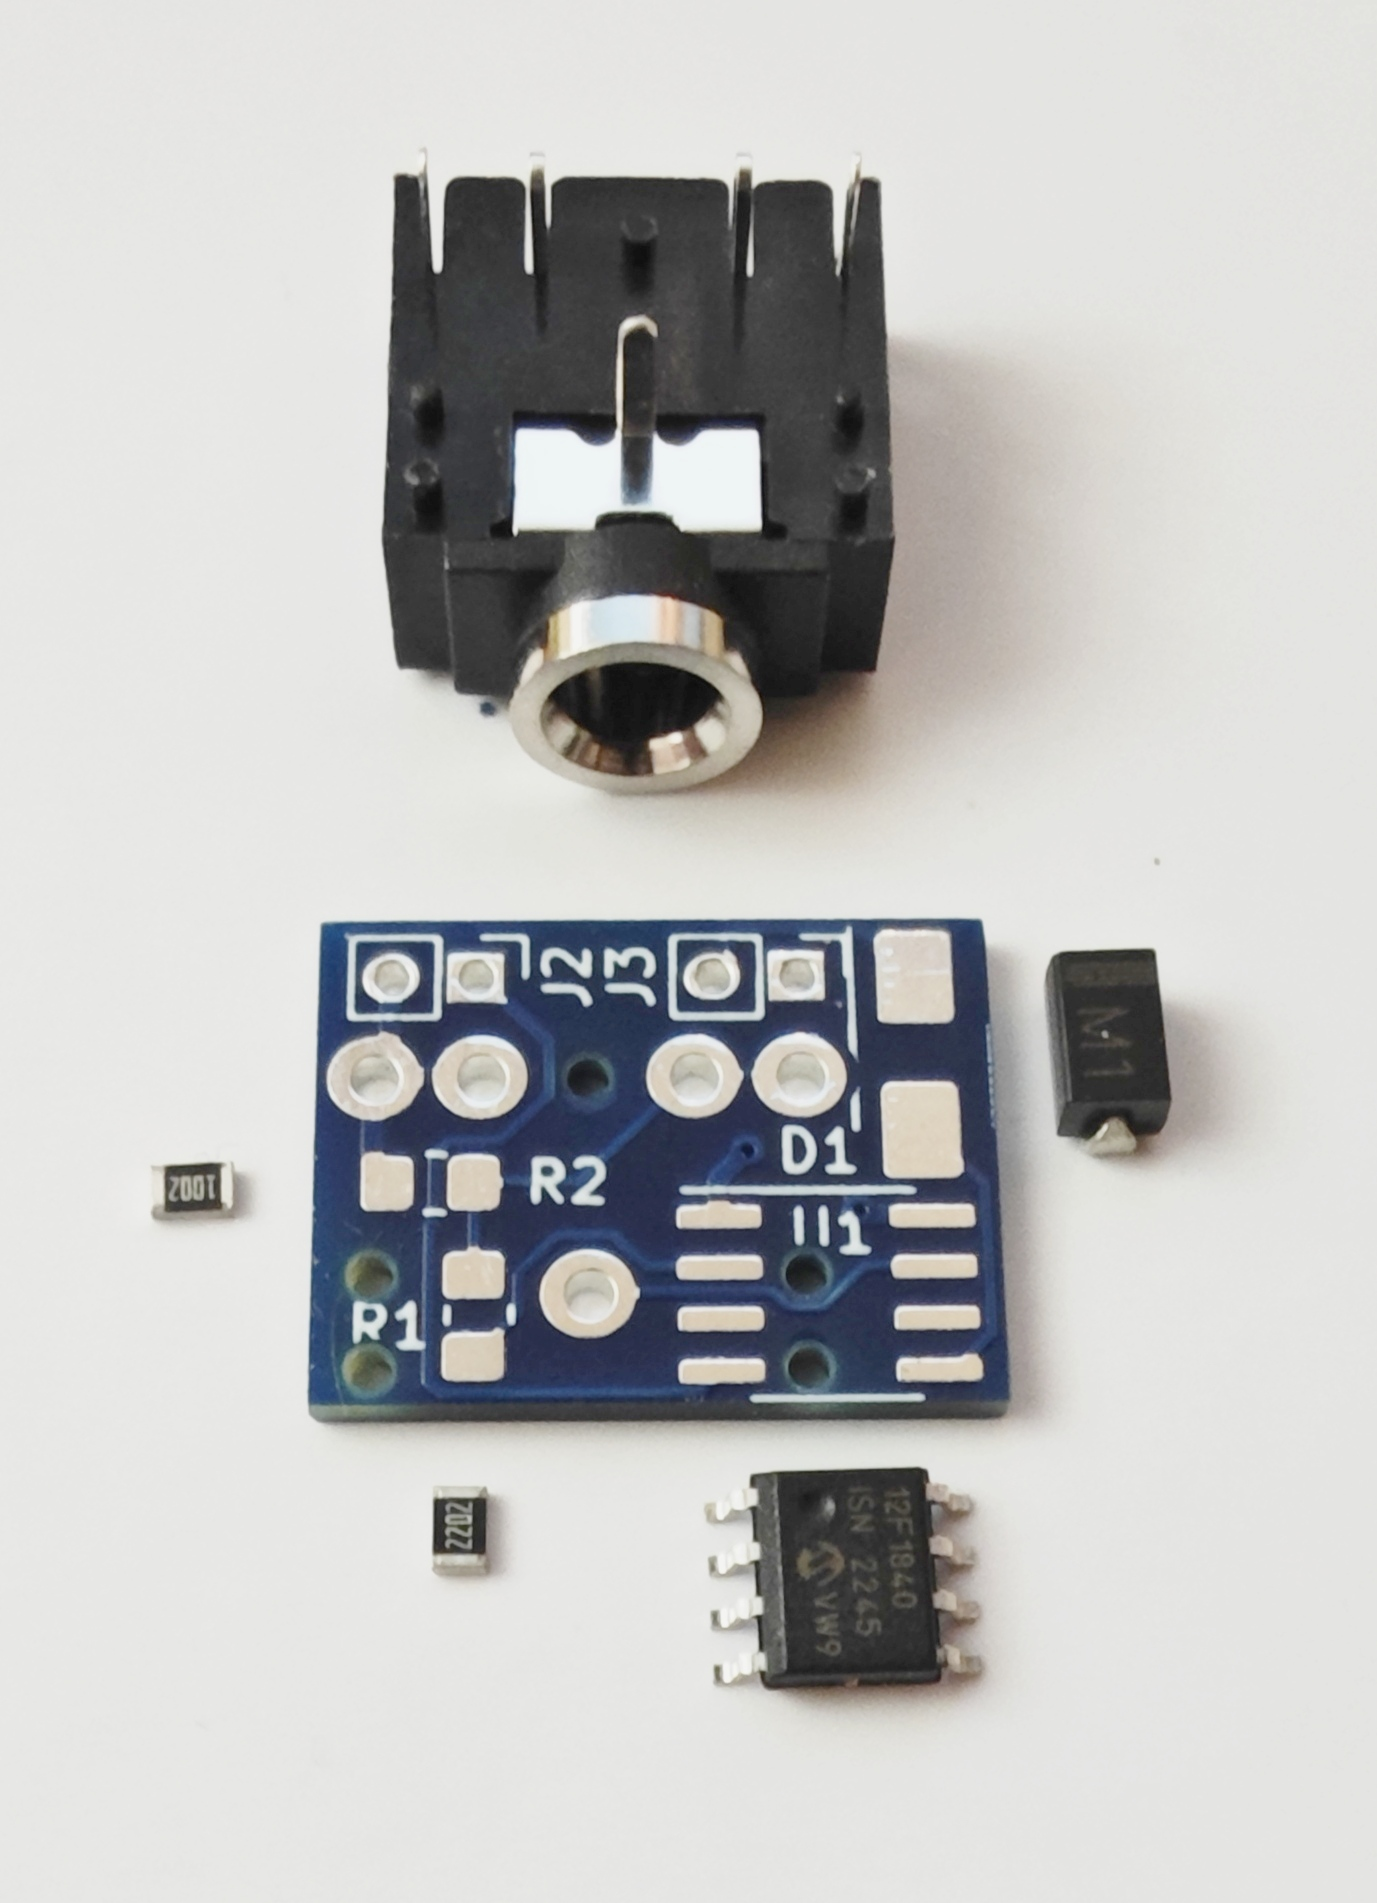
2) A FYSU PCB (VMM PCB at PCBWAY) – note that you can download the PCB gerber files from here too.
3) From the PICAXE store: PICAXE 08M2 (AXE007M2SM), Stereo PICAXE connector (CON039), PICAXE USB Download Cable (AXE027)
4) PICAXE Editor 6 software from above
5) The (click here:) VMM code file
6) 1N4001 SMD diode, DO-214 package
7) 22k 0.125w resistor, SMD 0805 package
8) 10k 0.125w resistor, SMD 0805 package
9) Any generic cabled USB mouse – wireless might work too, not tested.
10) A multimeter with continuity test or just use eyes in some cases.
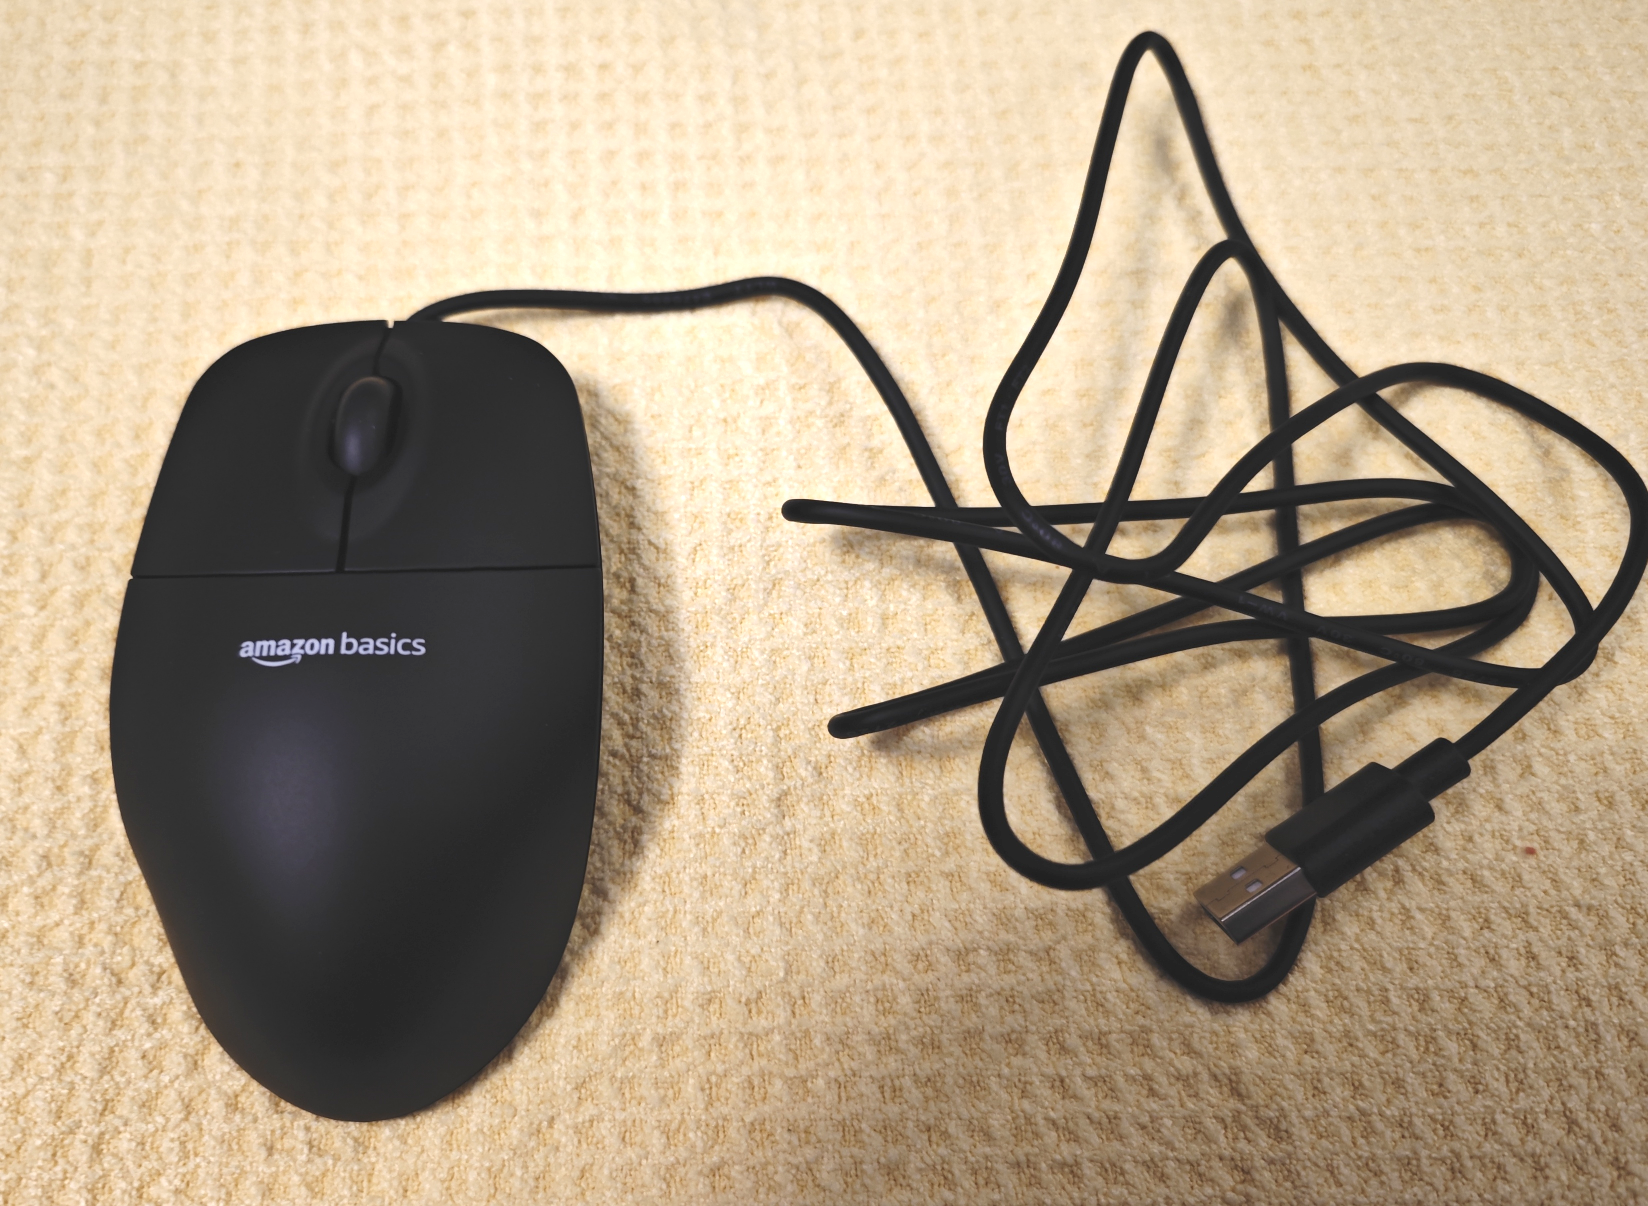
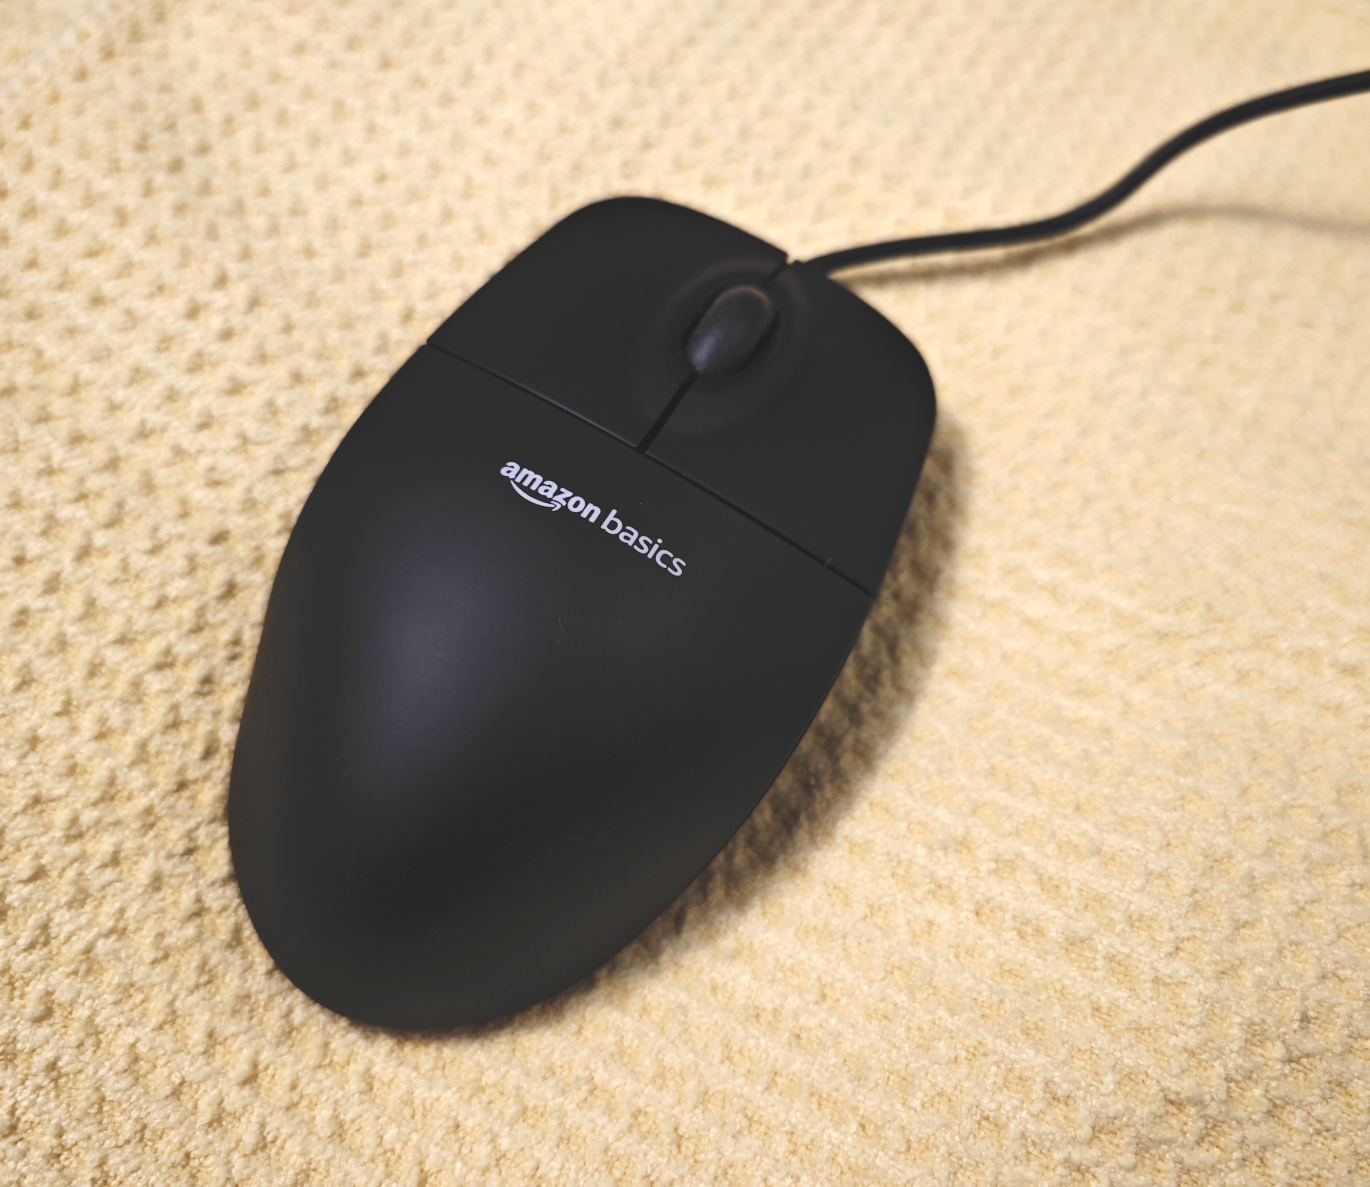
For this example I used a generic mouse from Amazon on their basics range. It doesn’t matter, spend as little as possible.
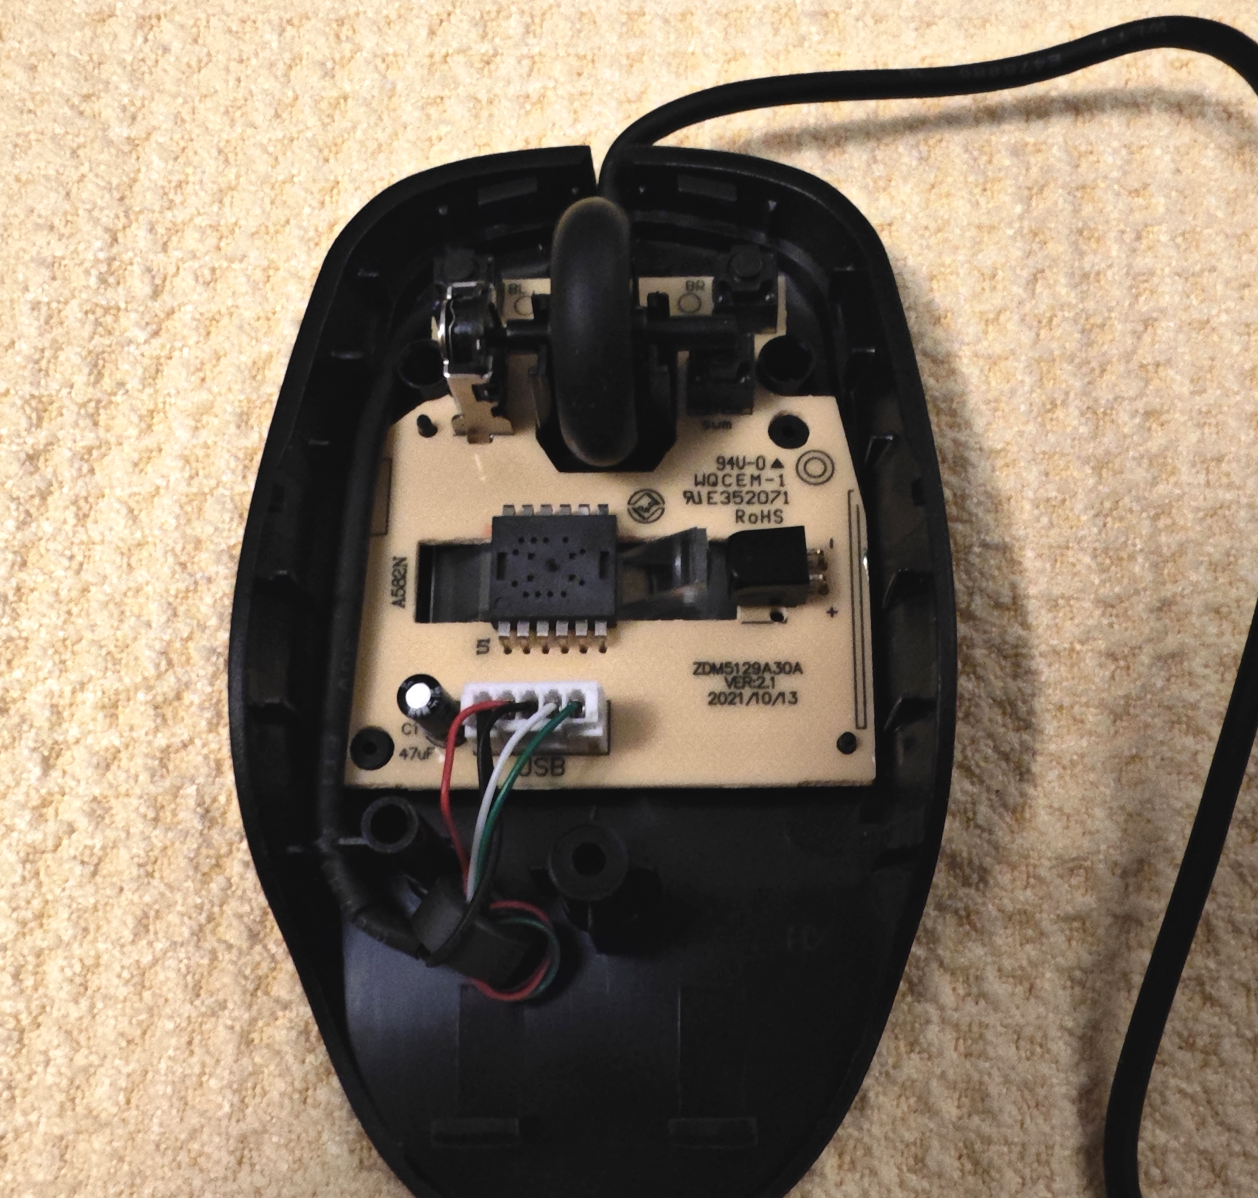
Start by opening the mouse – varies, these ones have a screw hidden under the label on the bottom, and some clips at the back.
Remove the mouse PCB, being careful to see which parts of the middle wheel are spring loaded and fly across the room – this again varies, the Amazon one was very securely fitted, I didn’t need to have removed it as I realised later.
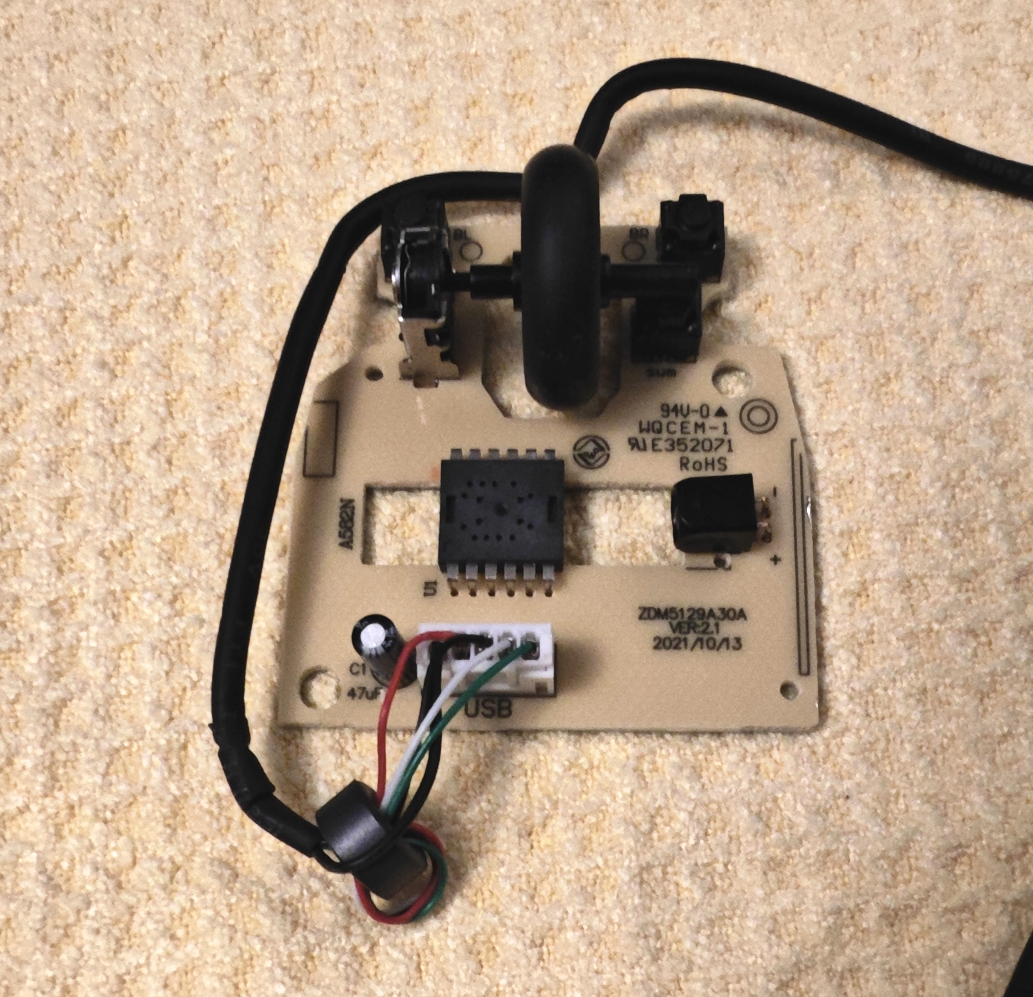
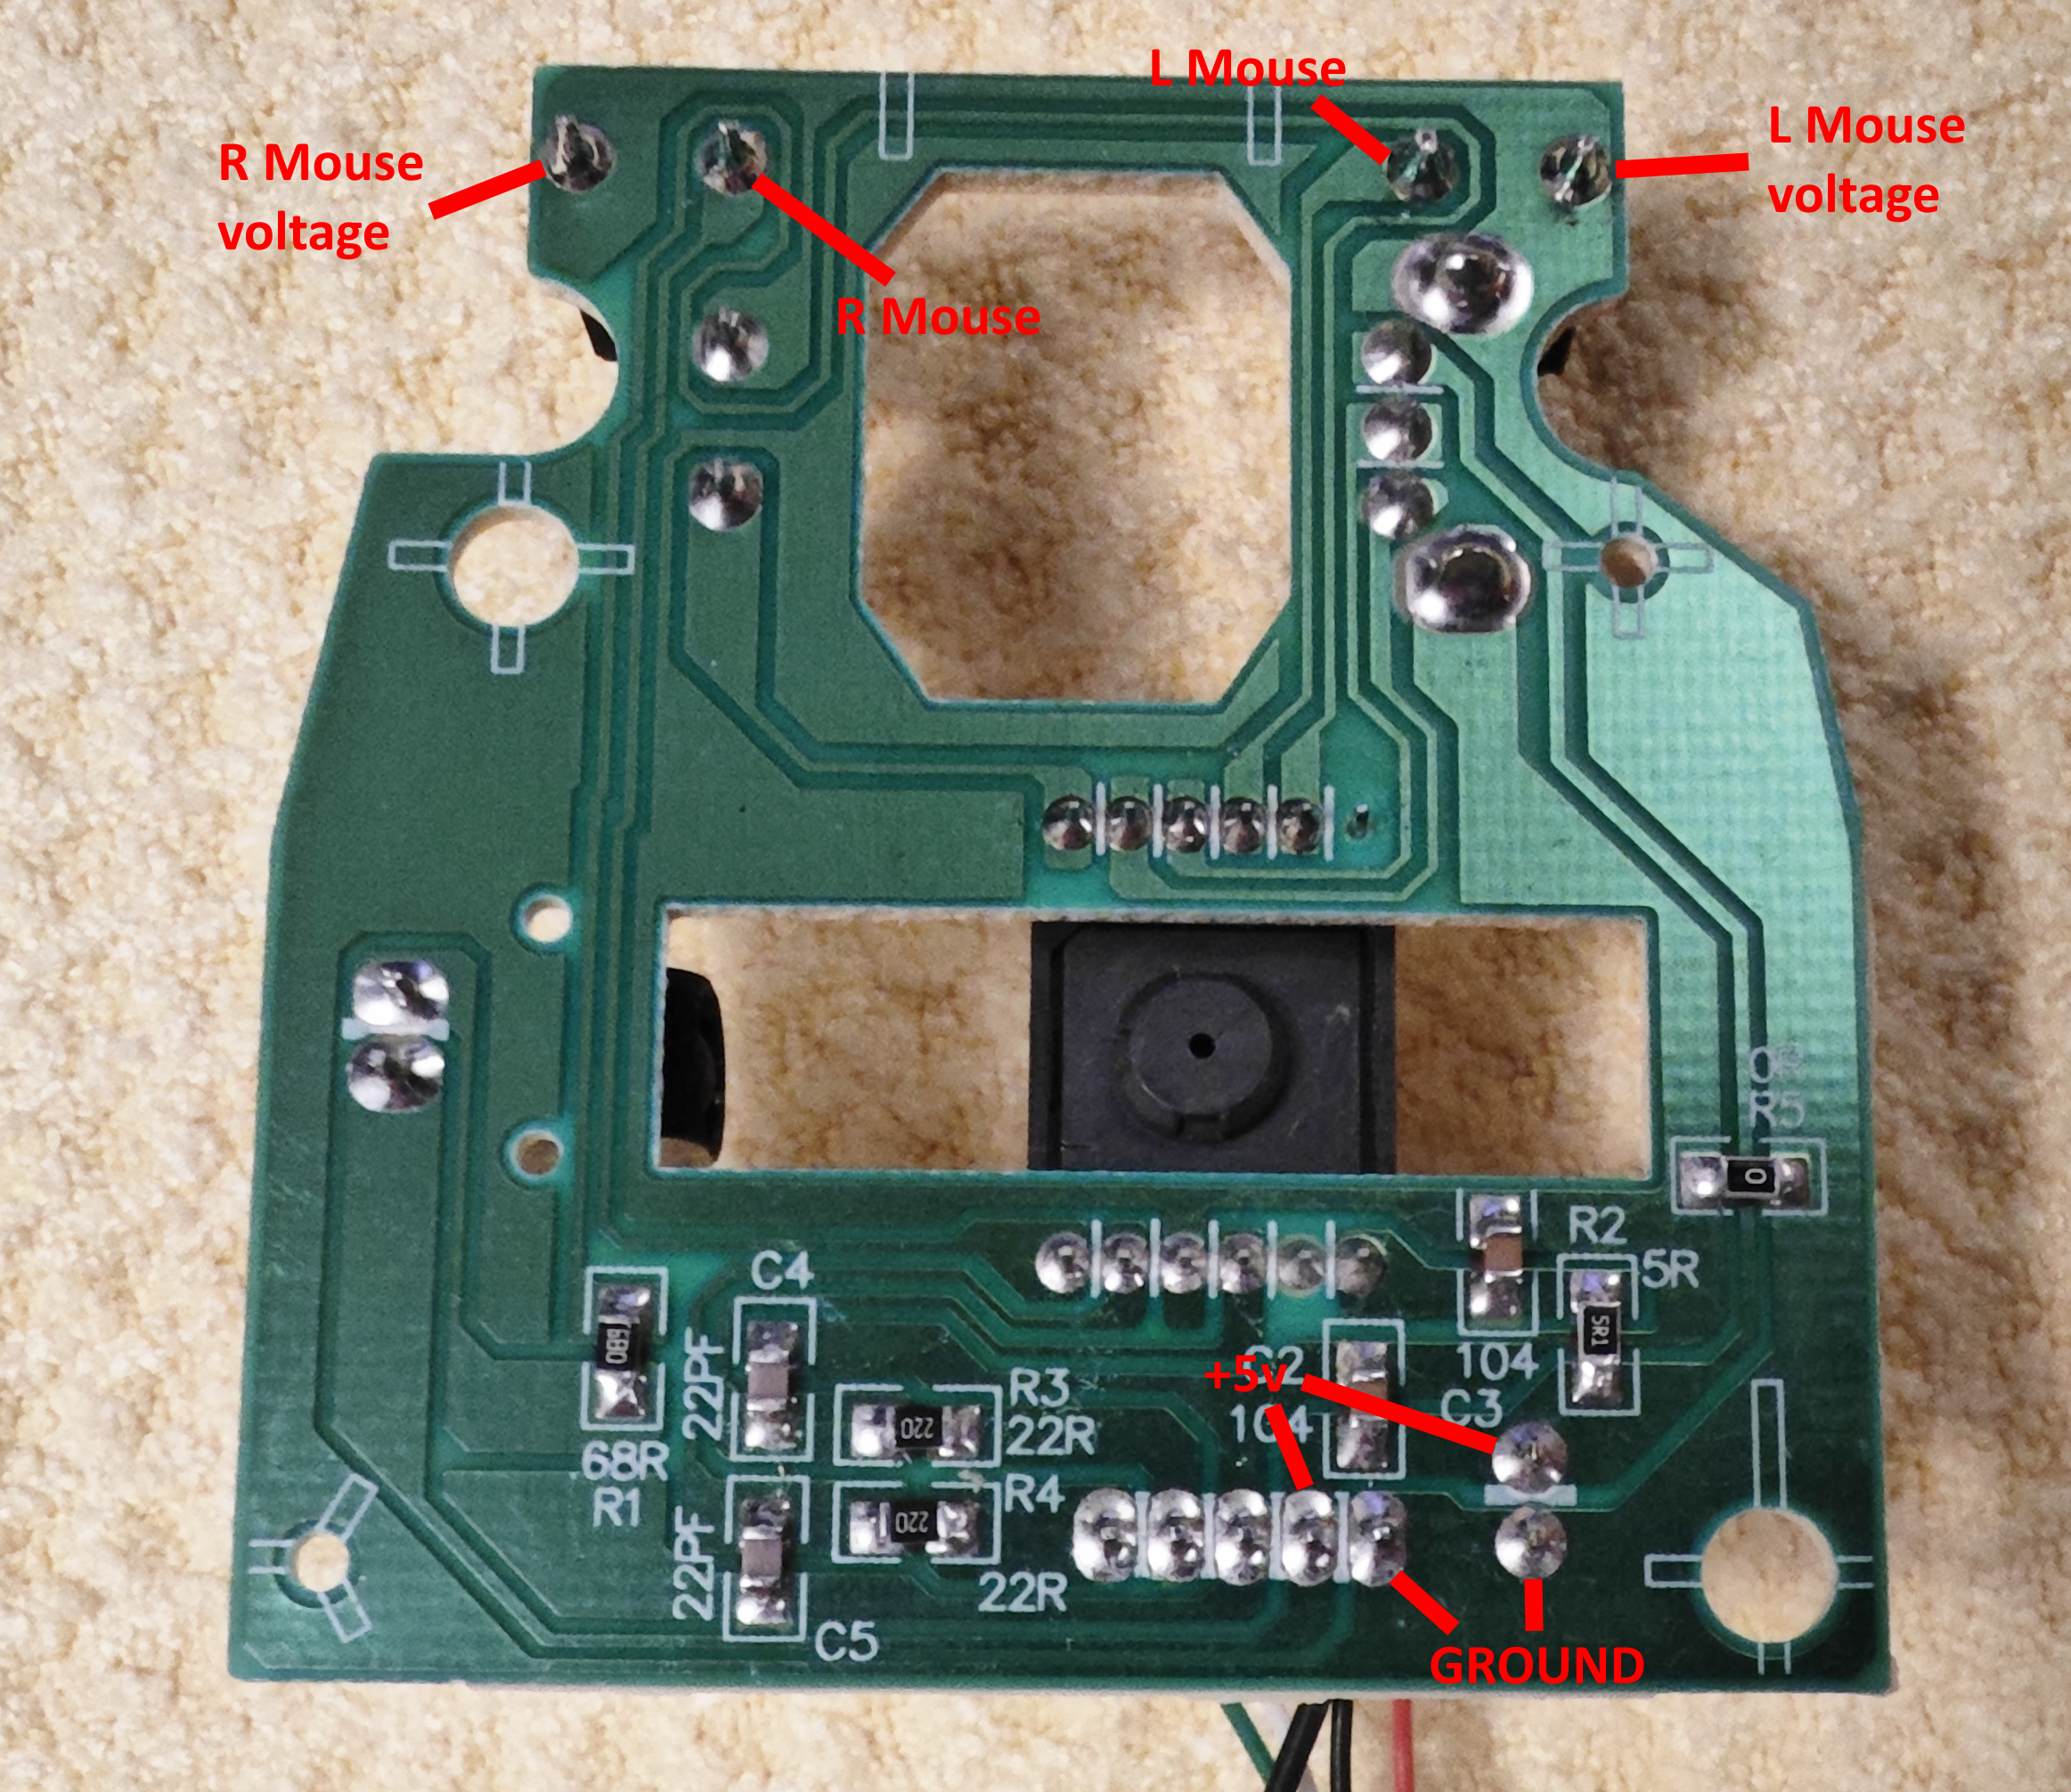
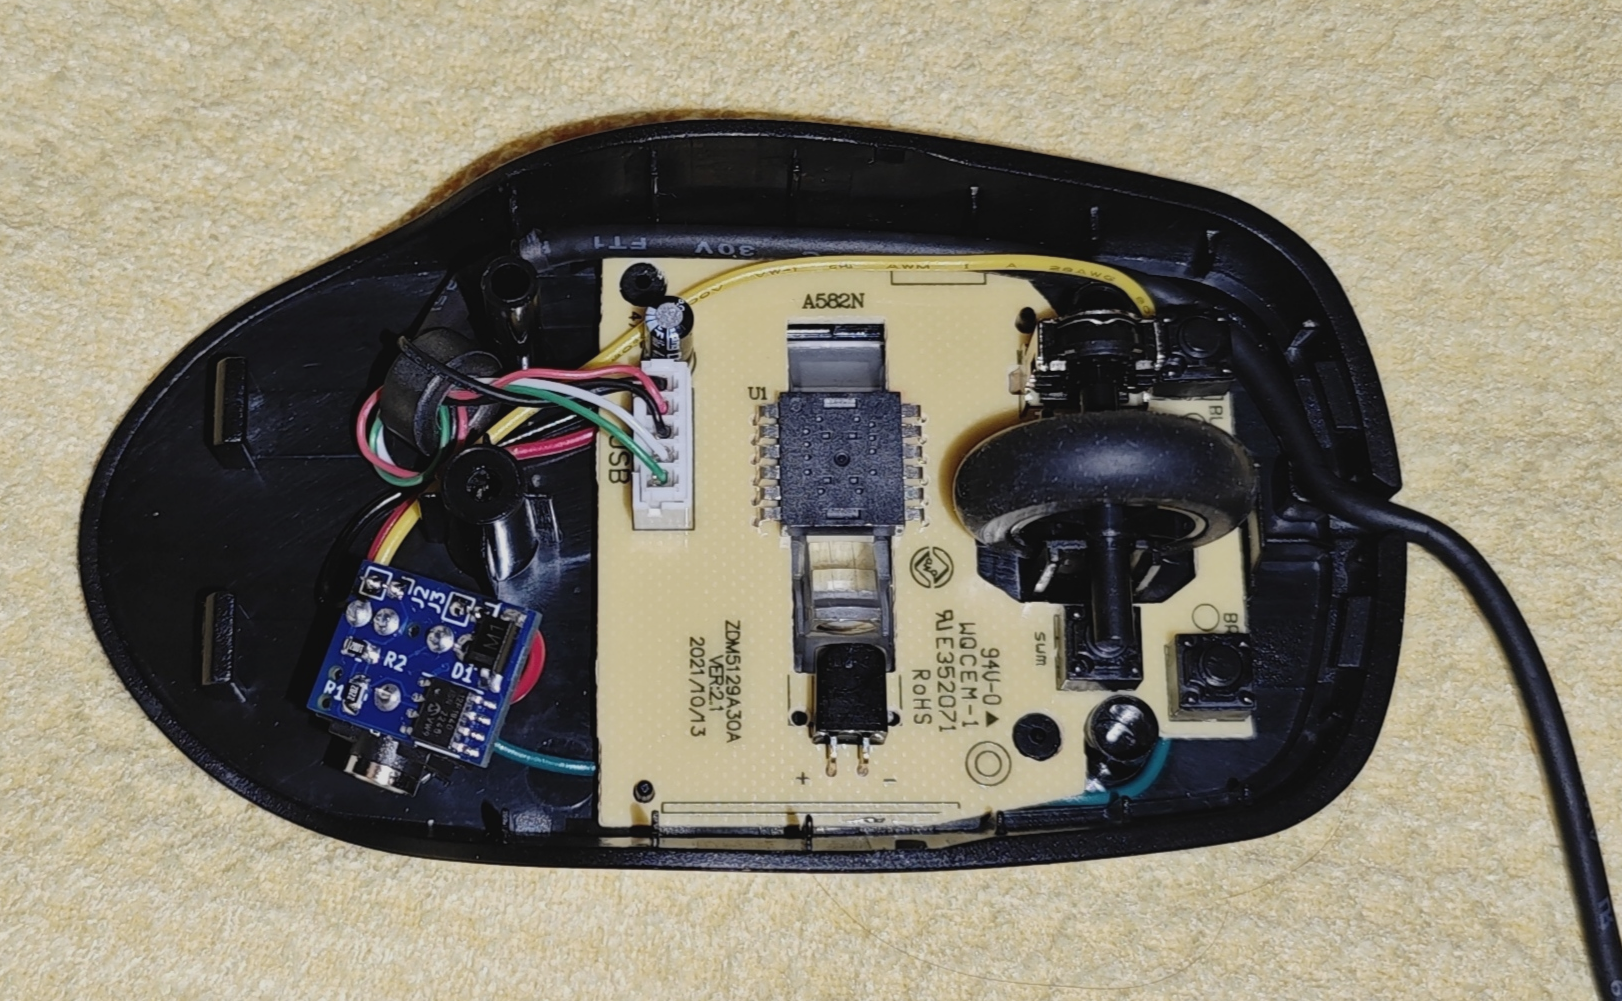
Pay attention to the connector – this is a very common layout but you can see the black and red wires which are ground and 5v. It’s very important to identify which is which, turn it upside down – the left and right button switches will have 2 pins, one goes to the encoder chip and the other will be connected to 5v or ground, you can use the multimeter to verify. MAKE A NOTE of which is connected to which.
On the mouse above you can see just tracing by eye that one pin of the left and right mouse buttons is connected to the big ground track. You should generally use the meter here set to continuity test (sometimes called buzzer test), if it’s set correctly it will beep when the probes are touched together. I’ve seen the left button connected to 5v or ground, I’ve never seen the right connected to anything but ground but that doesn’t mean they don’t exist. If the left button has a pin on 5v we will call it an ‘active low’ mouse, if it’s ground then ‘active high’ – it will matter later.
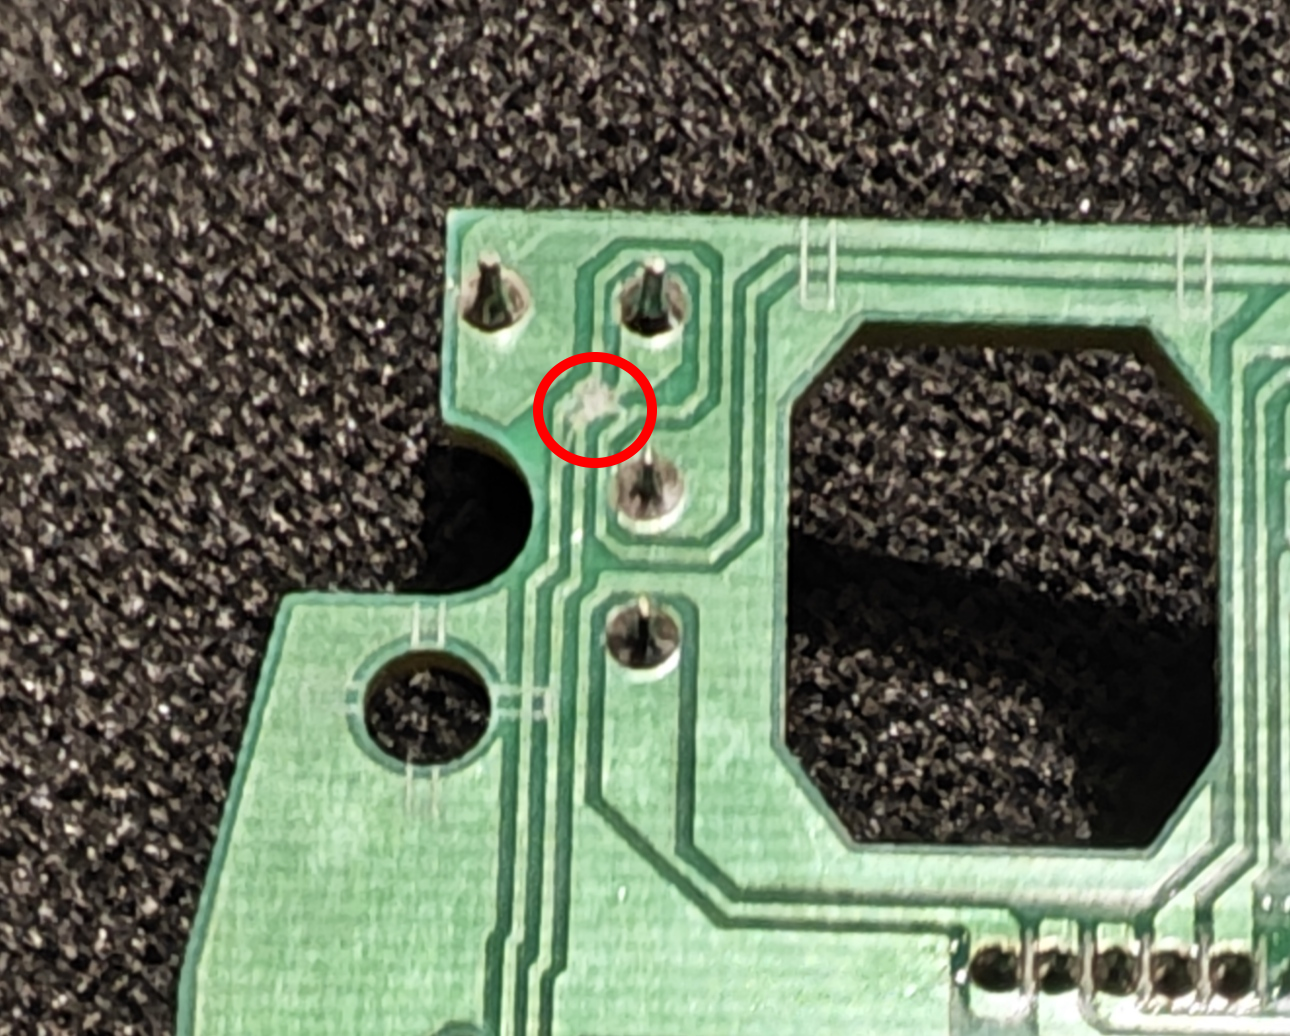
Cut the track for the right mouse button that isn’t connected to 5v/ground. Actually you could use any other button or even drill a hole and fit an extra one if you want, but one pin should be connected to ground. We’re going for the most basic example mod here though, so cut the R mouse button track.
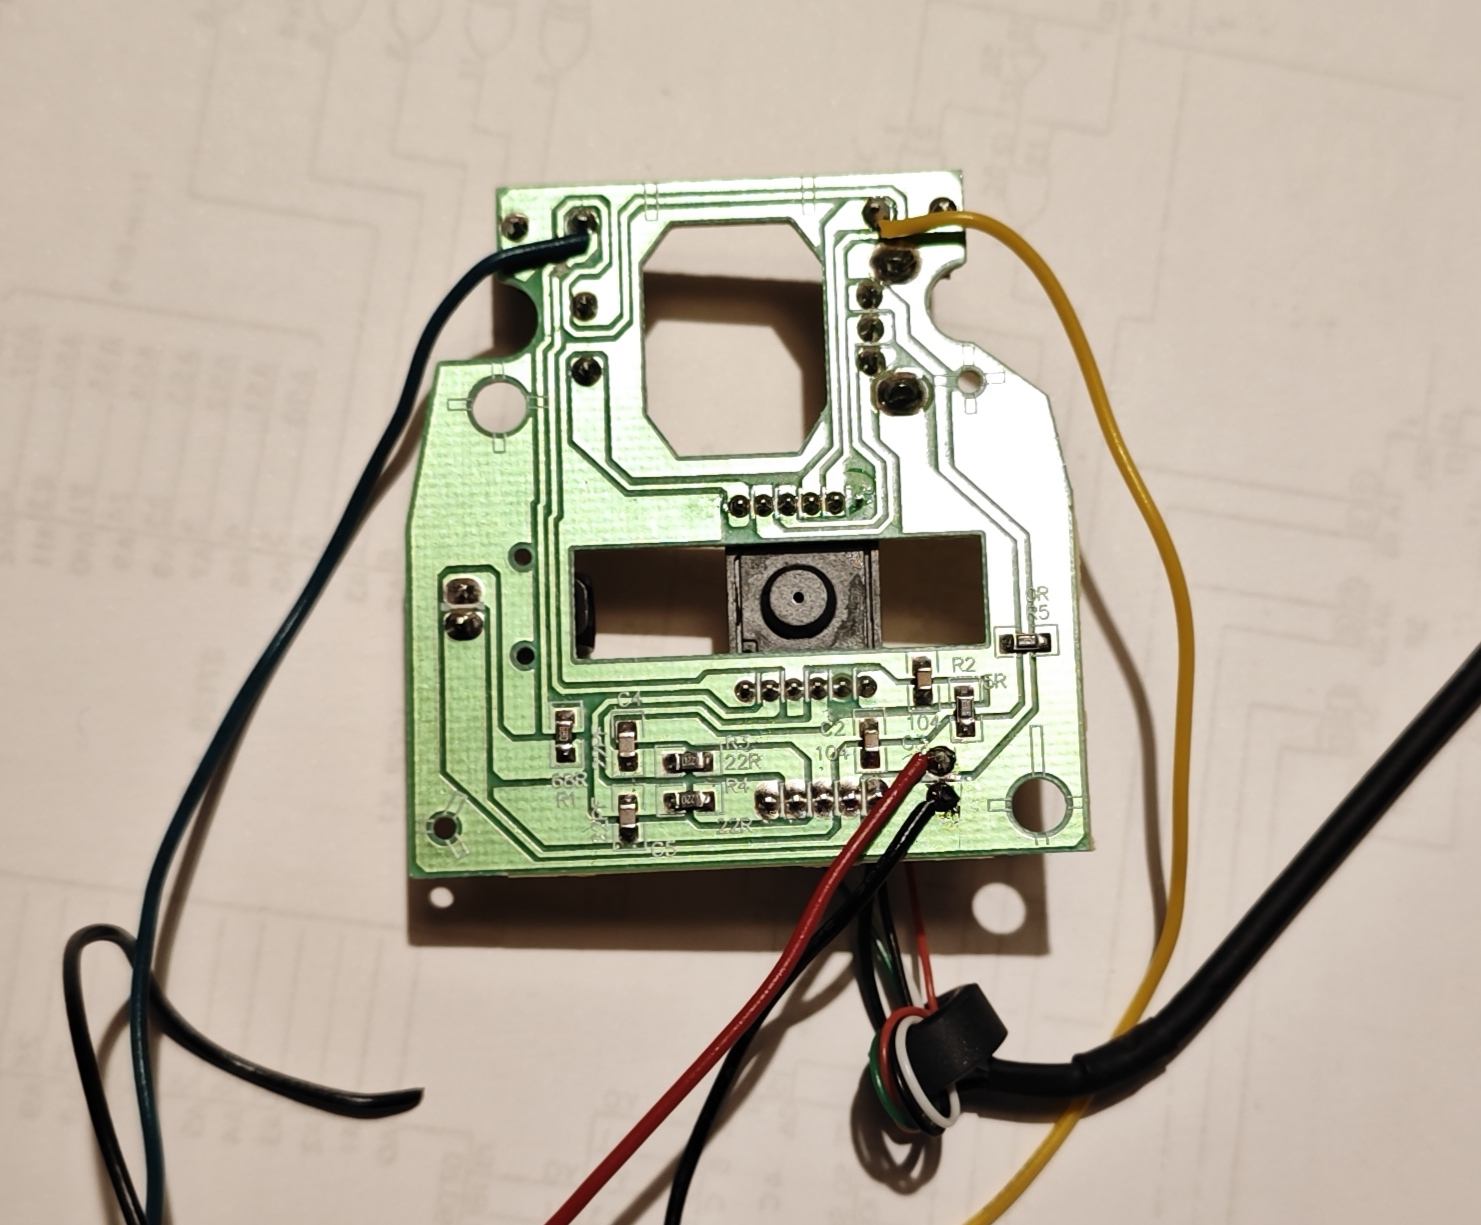
Now solder trailing wires to the left button pin, right button pin, any ground pin and any 5v pin.
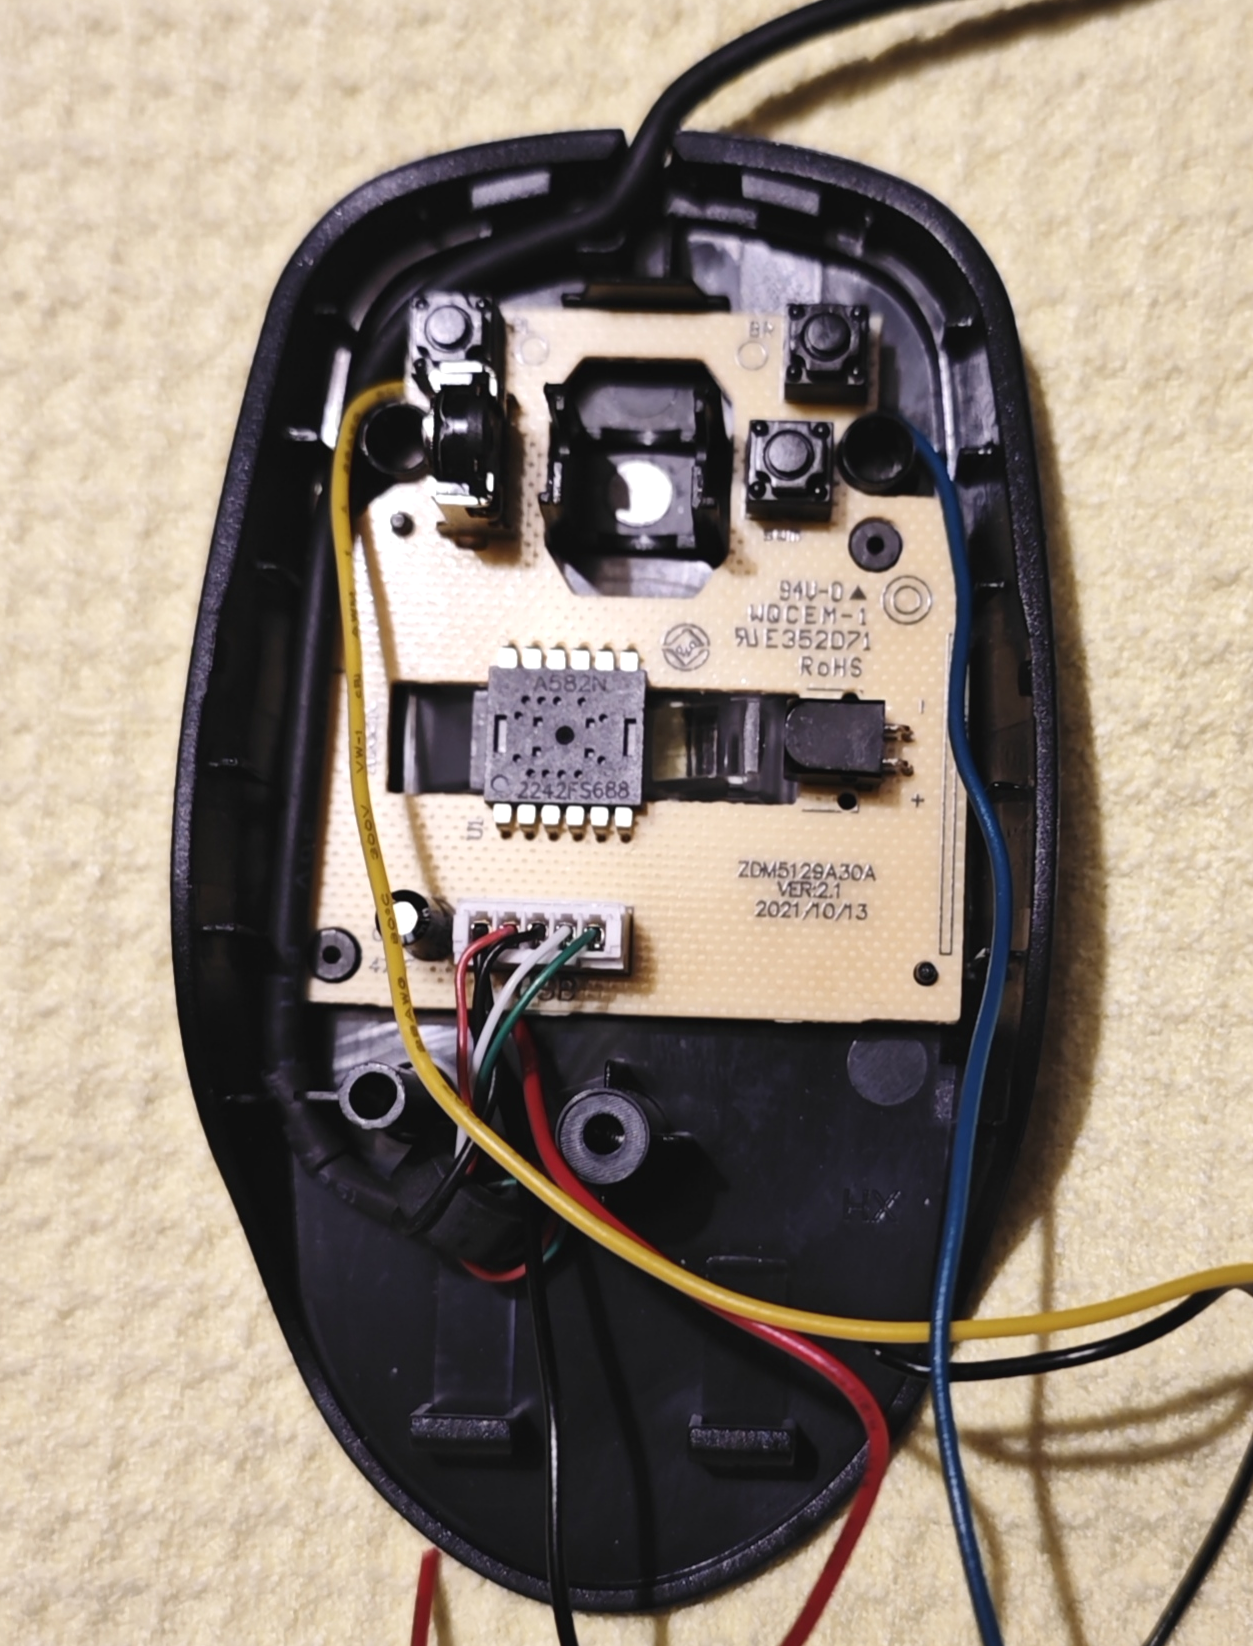
Place this back in the mouse, you can trim the wires and strip the ends now or leave it to later, but this step is to establish the best way for the wires to run, it was very easy in this mouse – much easier than a base model Logitech I did before.
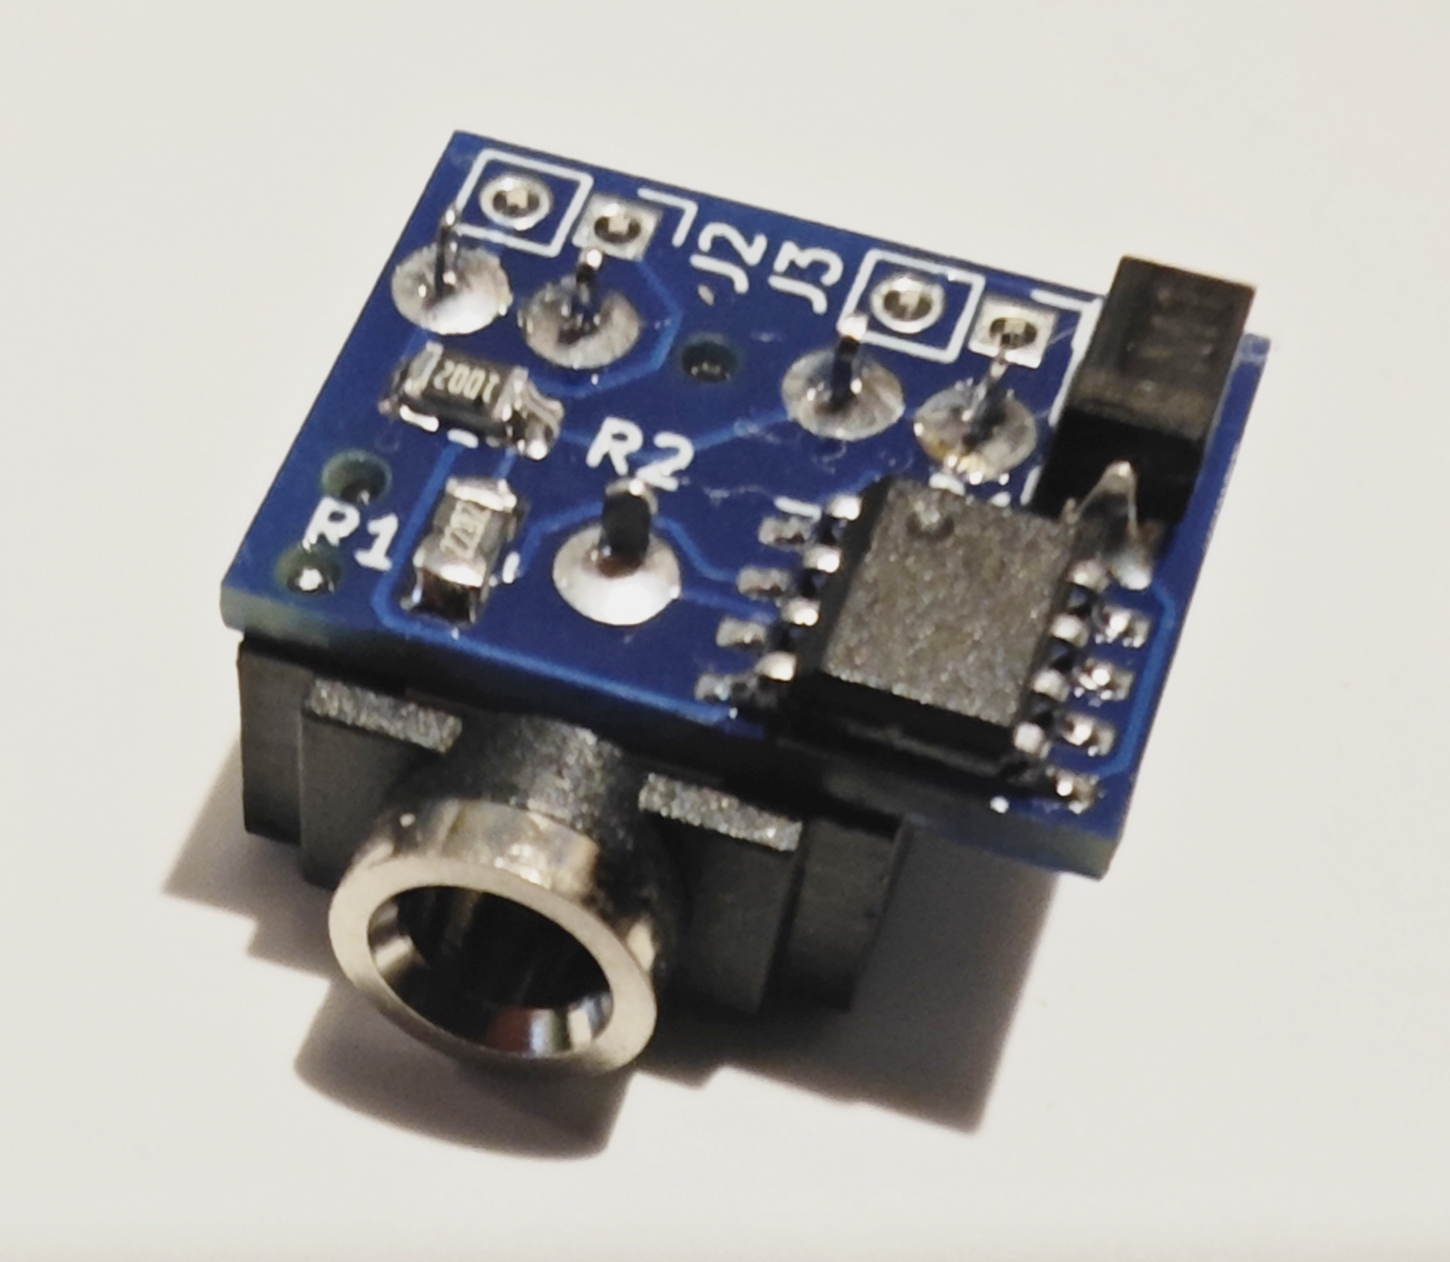
Now it’s time to assemble the macro module – the part locations are printed on the back of the PCB, but this picture should make it obvious. The first and most important step – if you have an active high mouse, the band on the diode should be towards the edge of the PCB, if it is active low it should be towards the middle next to where the PICAXE chip goes. If you get this wrong the module will not work. The Amazon basics mouse uses all grounds, so it’s active low.
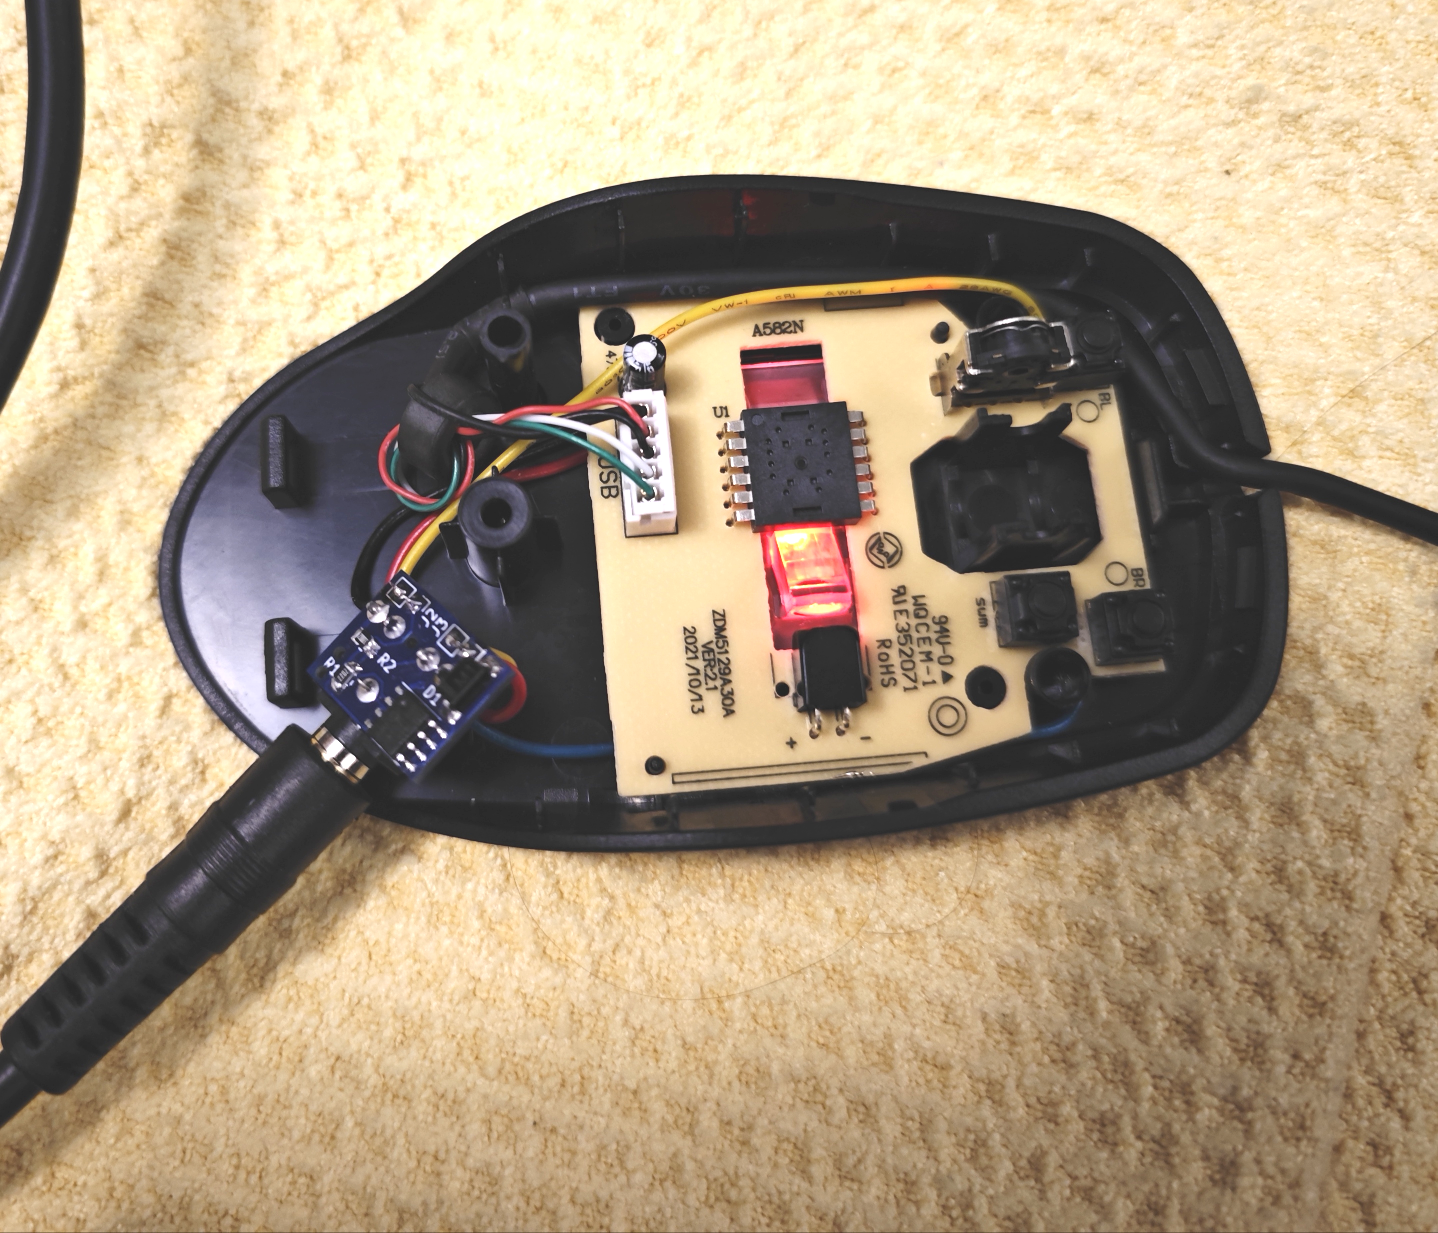
Fit the diode first, then the resistors (R2 is 10k, R1 is 22k), then the PICAXE chip – the dot is pin 1 and goes nearer the middle of the PCB. Finally fit the socket to the back of the PCB, it should look like this, note the position of the band on the diode. This is fine work and not really for beginners, I could make an easier to solder version but it would be physically larger. If in doubt get someone else to make it for you.
The 2x 2-pin empty pin holes J2 and J3 are where the wires go, underneath the PCB is labelled which is which but from left to right they are: ground, right button, left button, 5v. You can sanity check this with the meter on continuity test, as the top left (pin 1) on the PICAXE chip is 5v, and the top right (pin 8) is ground, the left button will be connected to the diode pad in the top right. You can now solder it to the wires in the mouse trimming and finding a decent location as appropriate.
On your PC, plug in the PICAXE serial USB cable and wait for Windows to decide it’s happy with the new serial driver. Install the PICAXE editor software – NOTE: the software and cable driver are only needed one time for the initial configuration, you can delete them afterwards if you want – there is no requirement to use them on the same machine the mouse will be used, once programmed the mouse will work on any type of computer, even a Playstation if you want. Load the macro module code.
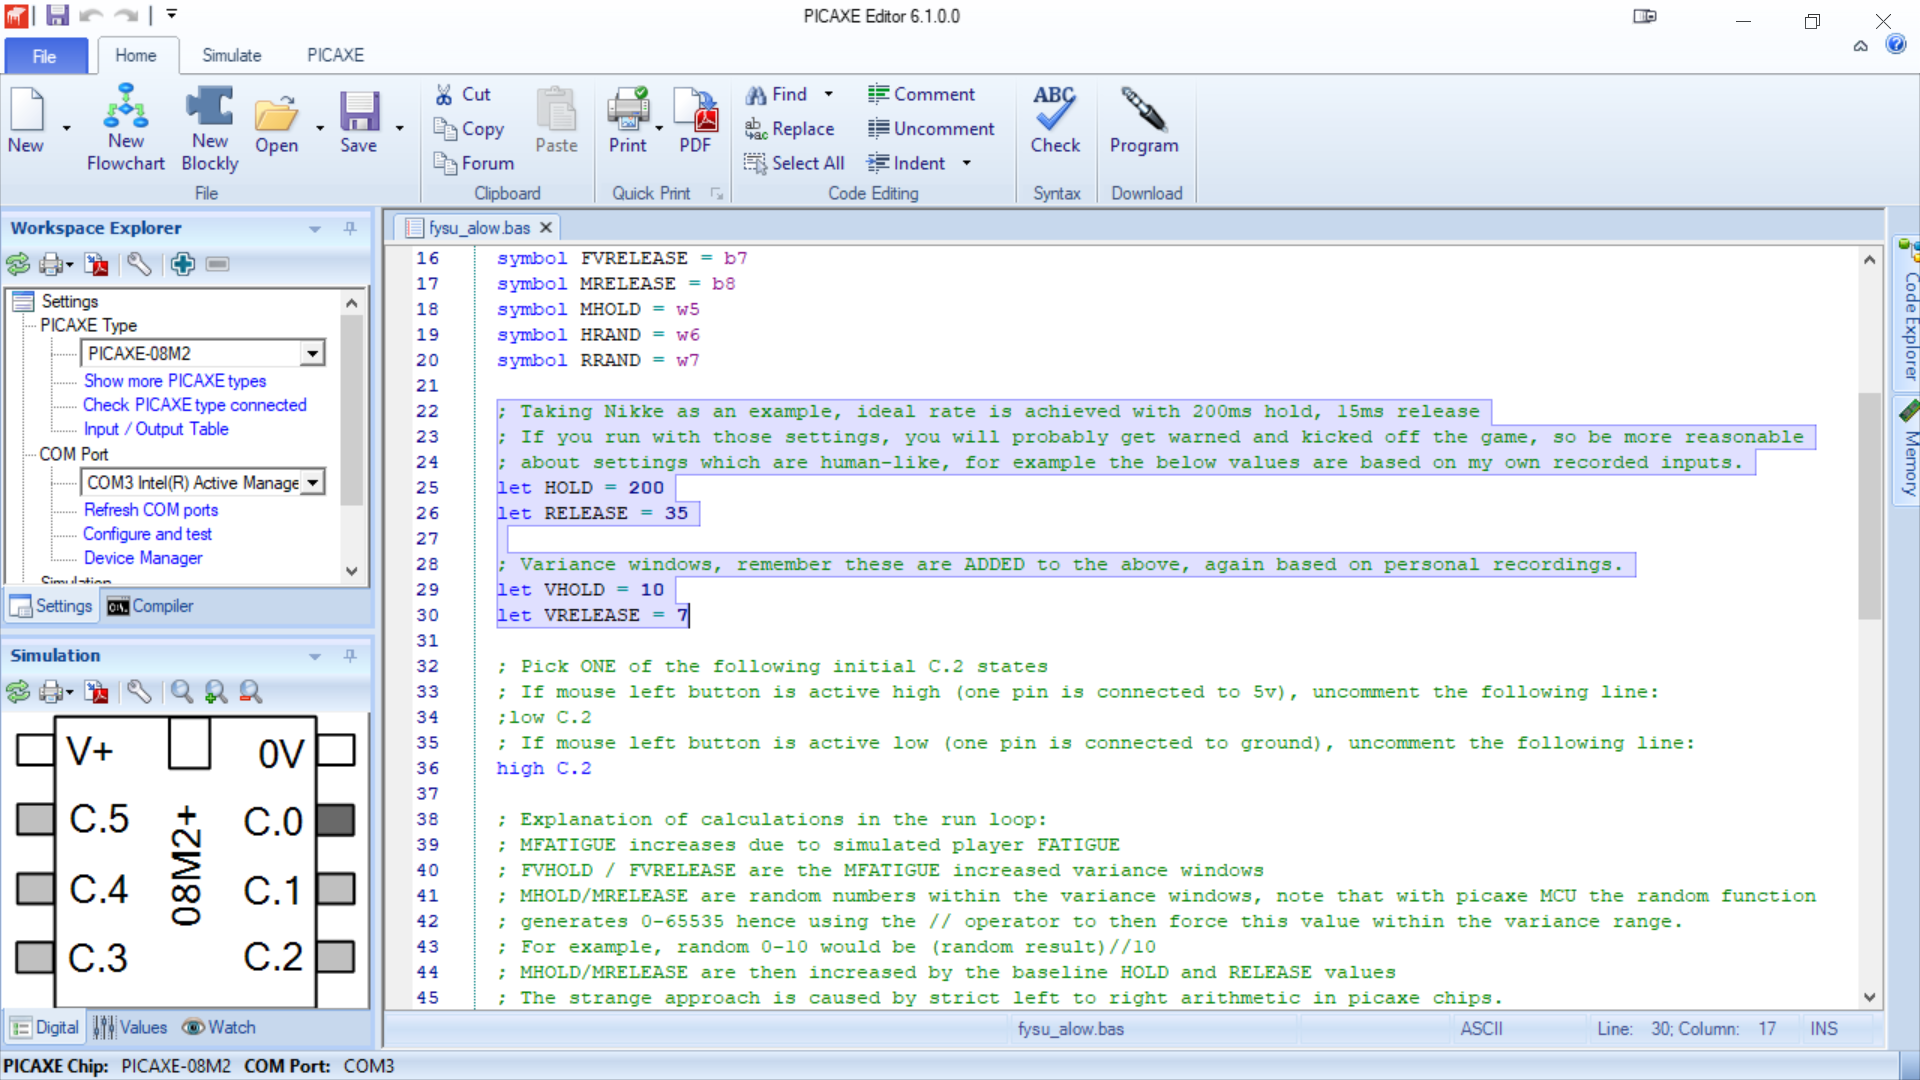
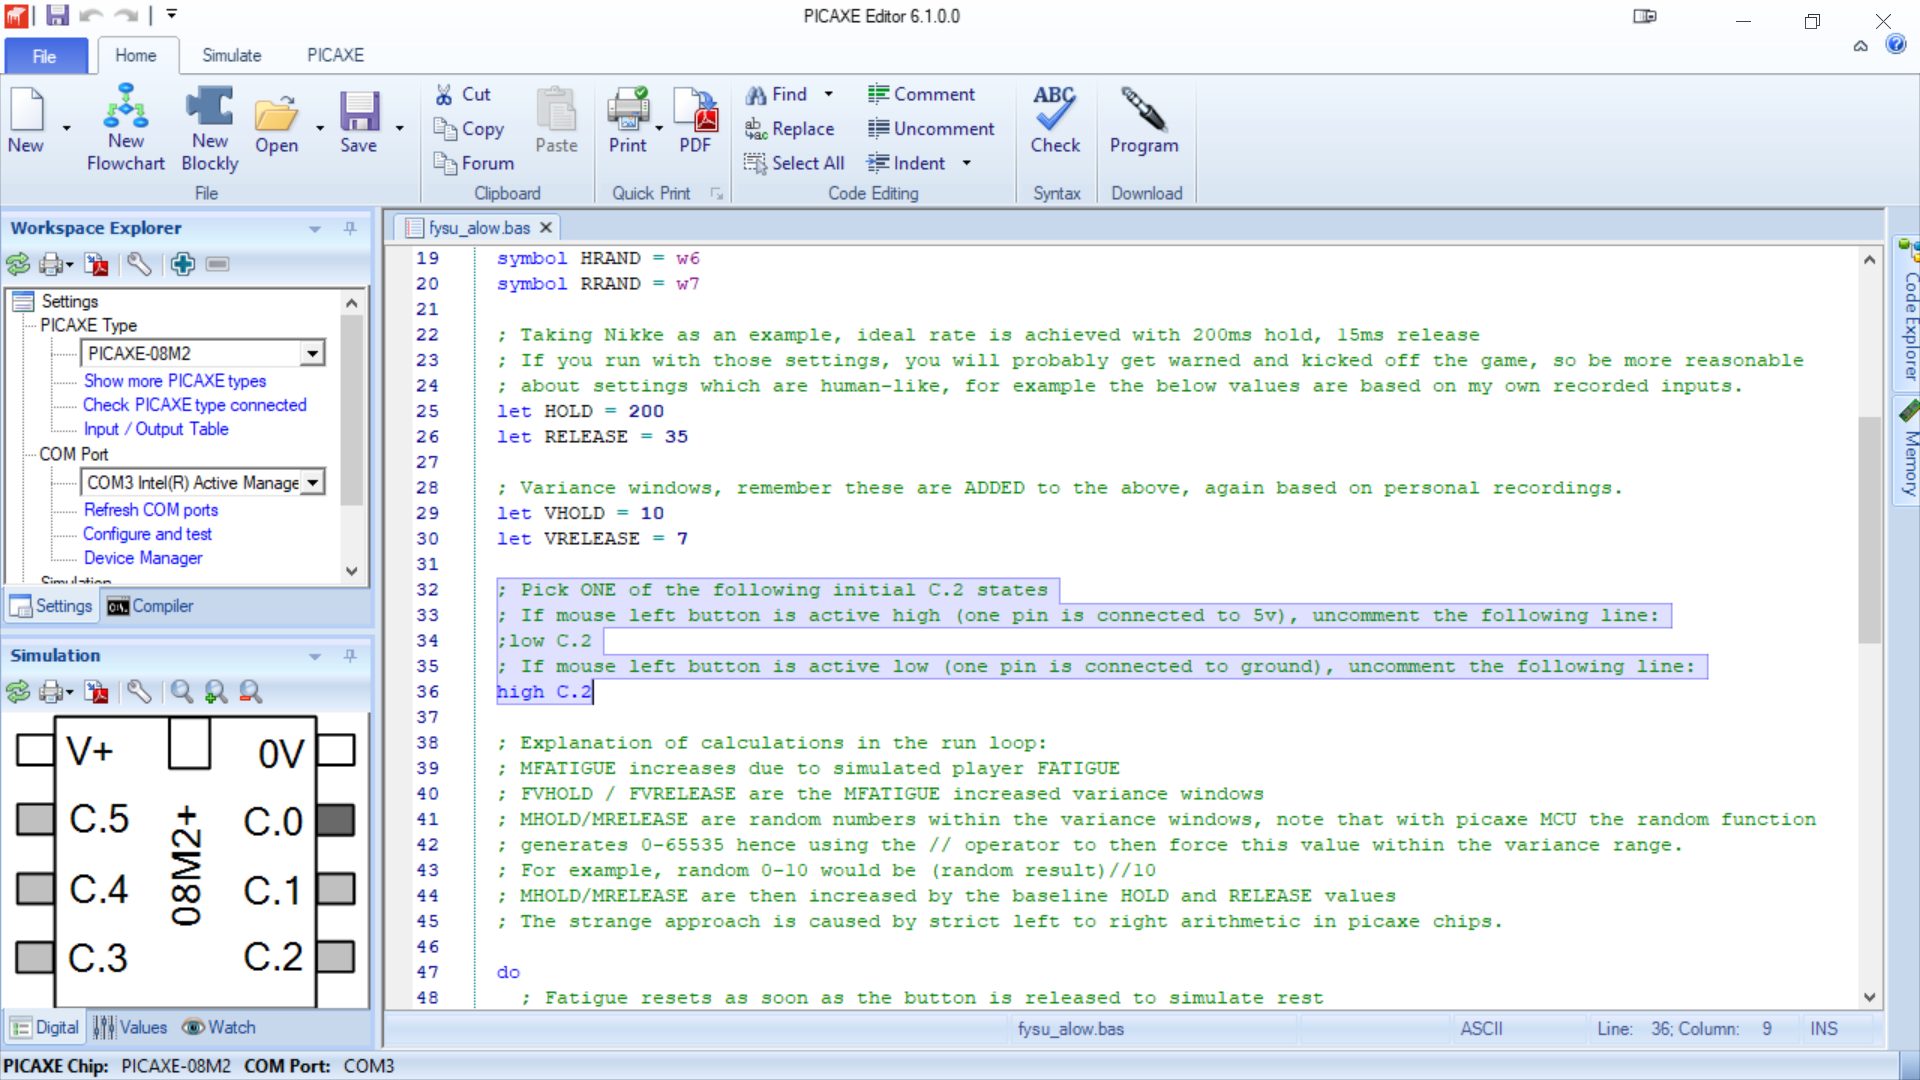
As you can see if you’re familiar with programming, it’s a cut down dialect of basic. You can ignore nearly all the comments (in green), but a few things may need adjusting. First find the section for click timing, and adjust it however you see fit for baseline hold/release and variances.
The next thing to check is whether it’s set up correctly for active high/low as appropriate for your mouse – this is how it should look for the Amazon one I picked which is active low:
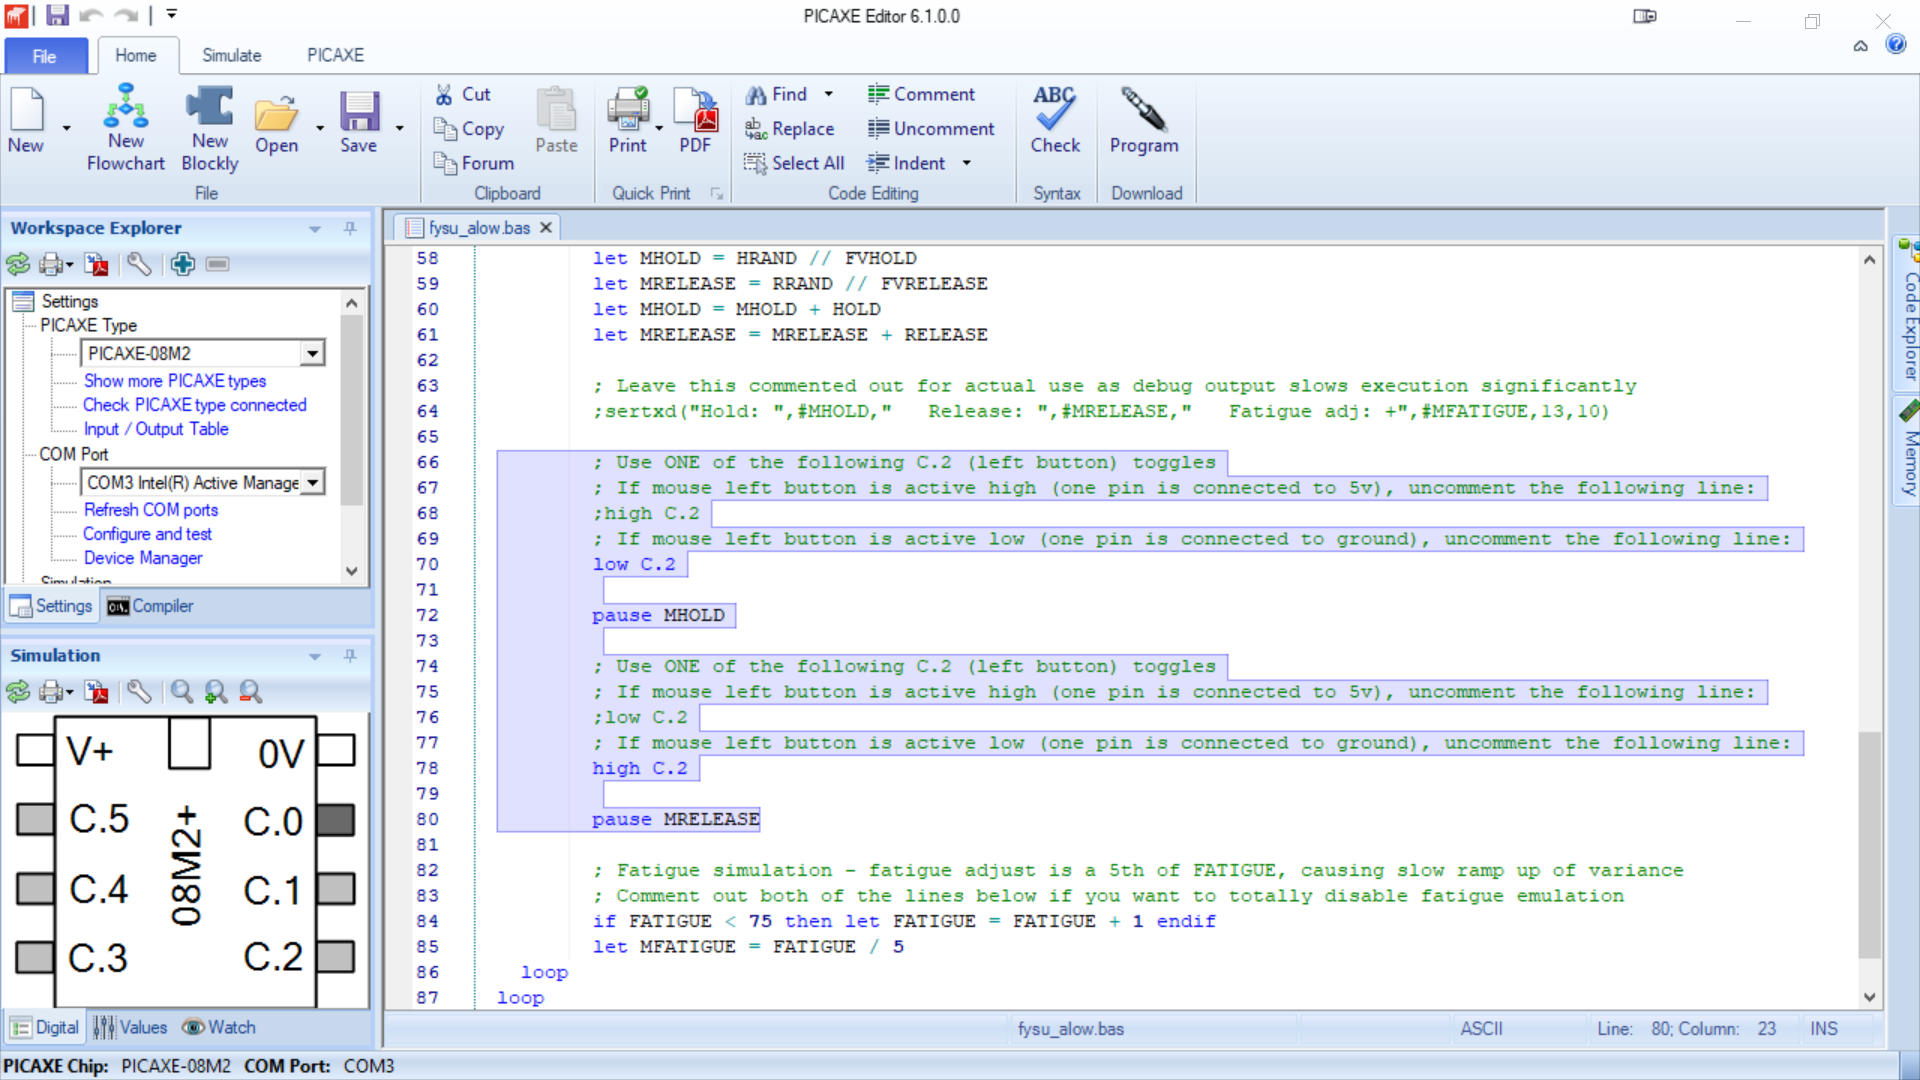
Same again for the hold / release cycle code in the main loop:
As an aside, at the bottom there you can see some code for FATIGUE – this emulates someone getting tired as they click the button, if you dont want that feature you can comment those lines out, or adjust the values to suit – but do not let FATIGUE go above 255 or strange things will happen, it may even stop working entirely until unplugged. Connect the other end of the serial cable to the programming port and plug the mouse into the PC or a USB power supply, the sensor will probably light up and then go dim until you move it again.
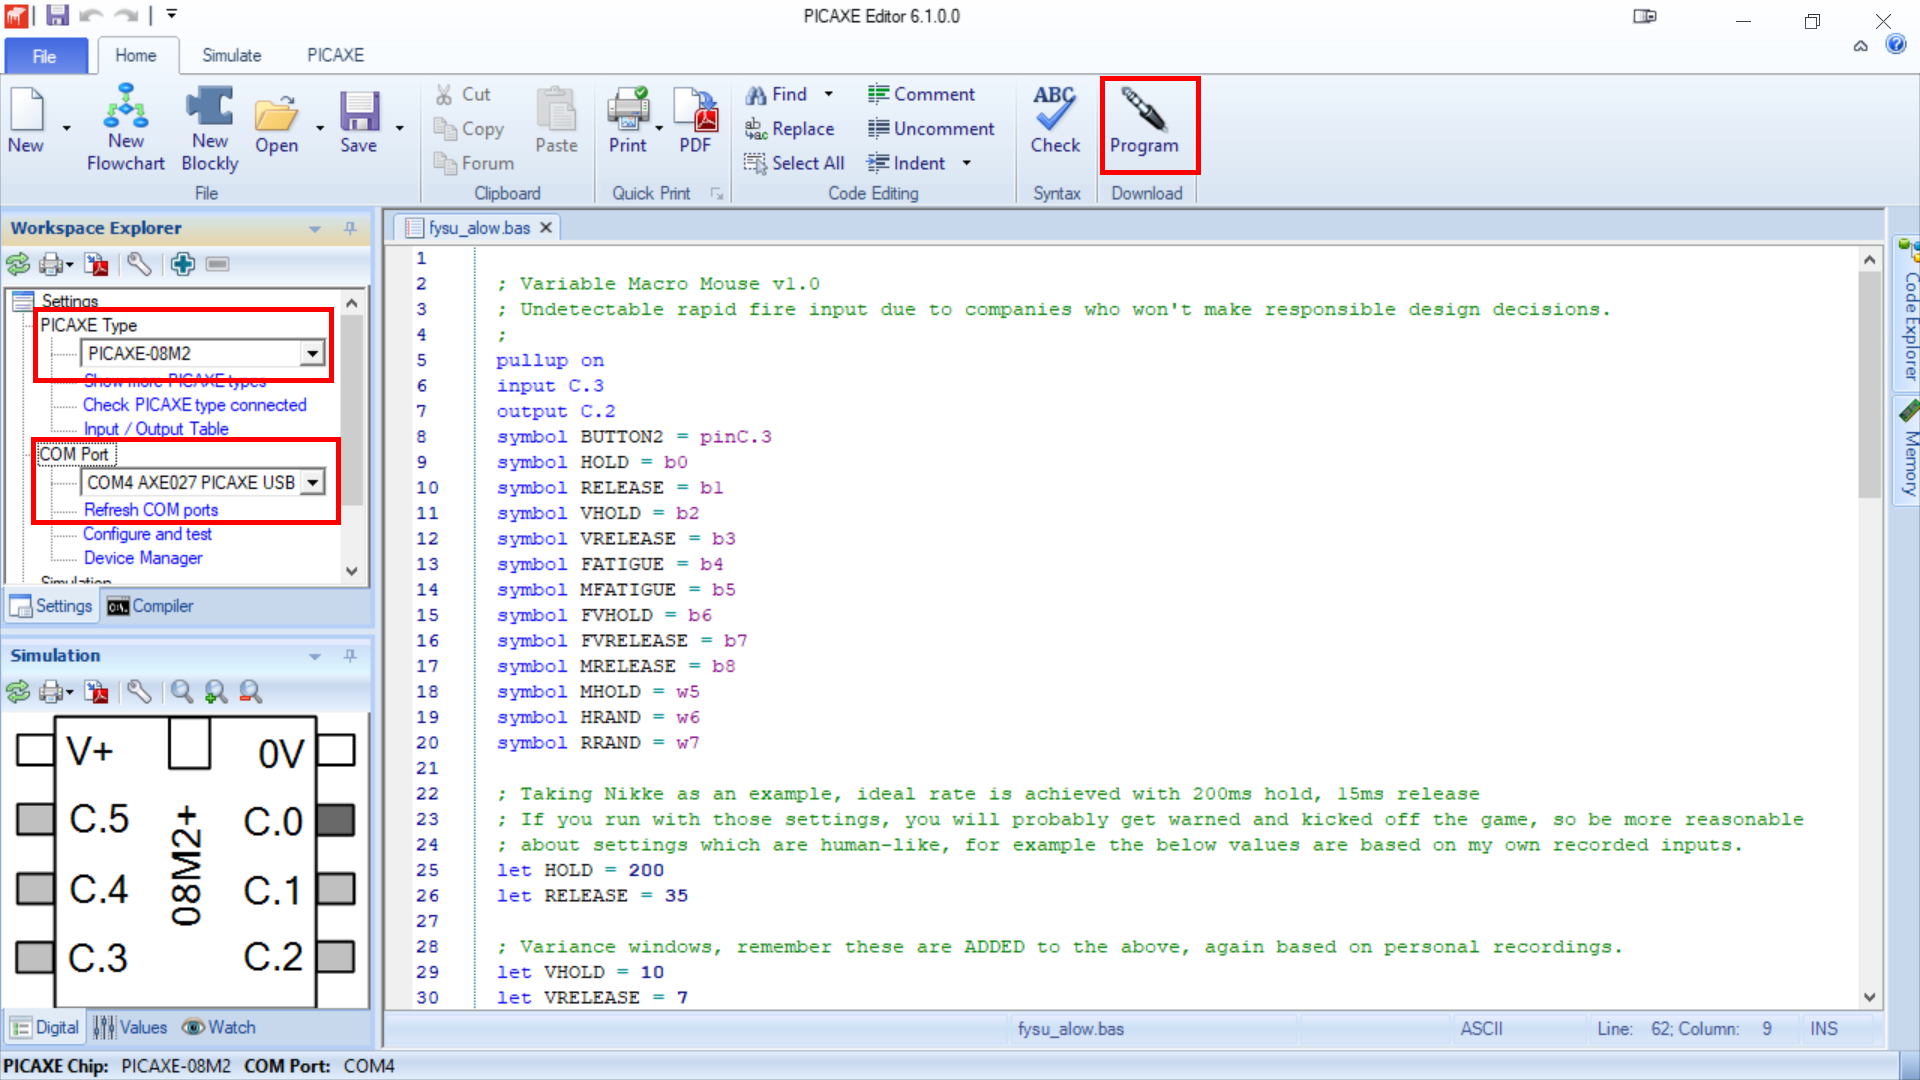
Make sure the right PICAXE-Type is selected in the top left (PICAXE 08M2) and that the correct serial port is selected which will show an AXE027, then click on Program.
Hopefully it will work, it usually does. If this fails the serial cable isn’t working properly, or the mouse isn’t powered properly, or the module is assembled incorrectly. Programming only takes a few seconds, you will see a progress bar bottom right. Once completed you no longer need the PICAXE editor software or the cable driver. Unplug everything and put the mouse back together.
Now test it, my favourite way is with a painting package – just choose a brush/line tool and hold the left button while dragging it around, you will get a solid line. Do the same but pressing the right button instead, you will get an intermittent line. You now have undetectable macro fire. Here’s an example I recorded a while ago testing the prototype on Nikke.
I’m releasing this publically as a gift to players of all games with this issue who may suffer from hand issues or be at risk of developing them. I don’t for a moment expect many people to actually build one of these, and it’s not a service I’m offering. It was an enjoyable science project, and I hope the fact that something like this can so cheaply and easily be constructed, will help guide developers towards making better control design and policy decisions.
