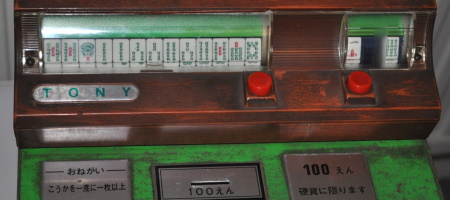
I was browsing Yahoo auctions recently looking for Mahjong control panels and an IMAX MJ adapter loom, when I came across an unusual little bartop machine, the “TONY”. The description stated that they’d plugged it in and nothing happened, but they had not put a coin in. I’m a sucker for old weird gaming tech so it ticked all the boxes.
So what on earth is it? After quite a bit of research as well as pulling the machine apart to fix it, this is a coin operated timer with an off the shelf TOMY Mahjong toy with a hole drilled in the battery cover to run power in. You get a little under 5 minutes of play for 100 yen and the idea is to just try to come up with a winning hand. It doesn’t do anything when you manage it, it’s just a toy. And yes they really did take a TOMY toy and sell it as a coin operated TONY.
I need to try to translate these, but you can tell how old it is from the fading on the instructions – I don’t understand the chemistry of it but blue is always the colour that lasts the longest. I don’t even think it was left in the sun because the clear plastic cover isn’t yellowed at all.
Naturally like an idiot the first thing I did was attach power and put in a coin. More on why that was terrifying later. Nothing happened at all except the red light came on, at the time it never seemed to go out unless I pushed more coins in to force the existing one through. More on why that was also terrifying later… First problem was the key is missing, it uses a sliding deadbolt and I really didn’t want to drill it.
I ended up deciding to try picking it instead. I’ve never picked a lock before and bought a cheap set of picks on Amazon. When they arrived I tried the ‘rake’ method which was useless, and then picking each pin by hand. A few minutes later – success!
This photo was actually taken after I’d fixed everything although I’m waiting for some rubber insulated bullet connectors to replace the ugly terminal block. Blue tape was just so I didn’t get the wires mixed up, they’re ink marked now. As you can see the coin box is actually a small velcro closing bag, I found 100 yen in there so I don’t know if the story about not testing it was true or not. Pay close attention to the positioning of the transformer.
I think it’s time to explain why pushing coins in and just powering it up were simultaneously bad ideas. Firstly the power flex had many tiny chunks missing from the insulation, I hadn’t noticed because I stupidly didn’t check – these were exposing mains wire. Secondly, the transformer is held in with one nut and braces against the side using adhesive foam. I had to jury rig a replacement for that as a shop sold me single sided instead of double sided, but that foam is the only thing stopping the transformer case from touching the metal body, which is not grounded. Also notice the transformer body is PART OF THE LIVE PATH, the voltage goes to the mounting bolt/nut, through the body and a wire runs from that to the transformer input. I have no idea why this isn’t just a wire from the bolt to begin with.
And onto the final item of danger – the timer works when a coin is put in, and the timing is based on how long it takes for a very low geared motor to turn a metal disc. A post on the disc pushes the coin release which drops the coin into the bag and then continues to spin until the post on the disc has disengaged from the coin release. Uses a switch right? No, the 100 yen coin acts as a conductor across the coin mechanism, it is the live voltage path to the motor. The reason the motor still runs afterwards is a sprung voltage feed touching the disc and therefore the coin release, keeps feeding the motor until the post disengages. It’s not a very good description, sorry.
What does this mean? Nearly every metal surface is live. The bolts are mostly live, the transformer casing is live, the actuating disc is live and even the coin has 100v across it. If a coin is in there and you pile another 3 on top so that one is poking out of the coin slot, that’s a good way to touch a 100v mains feed. Safety standards in the 70s were not what they are now. On to the repairs.
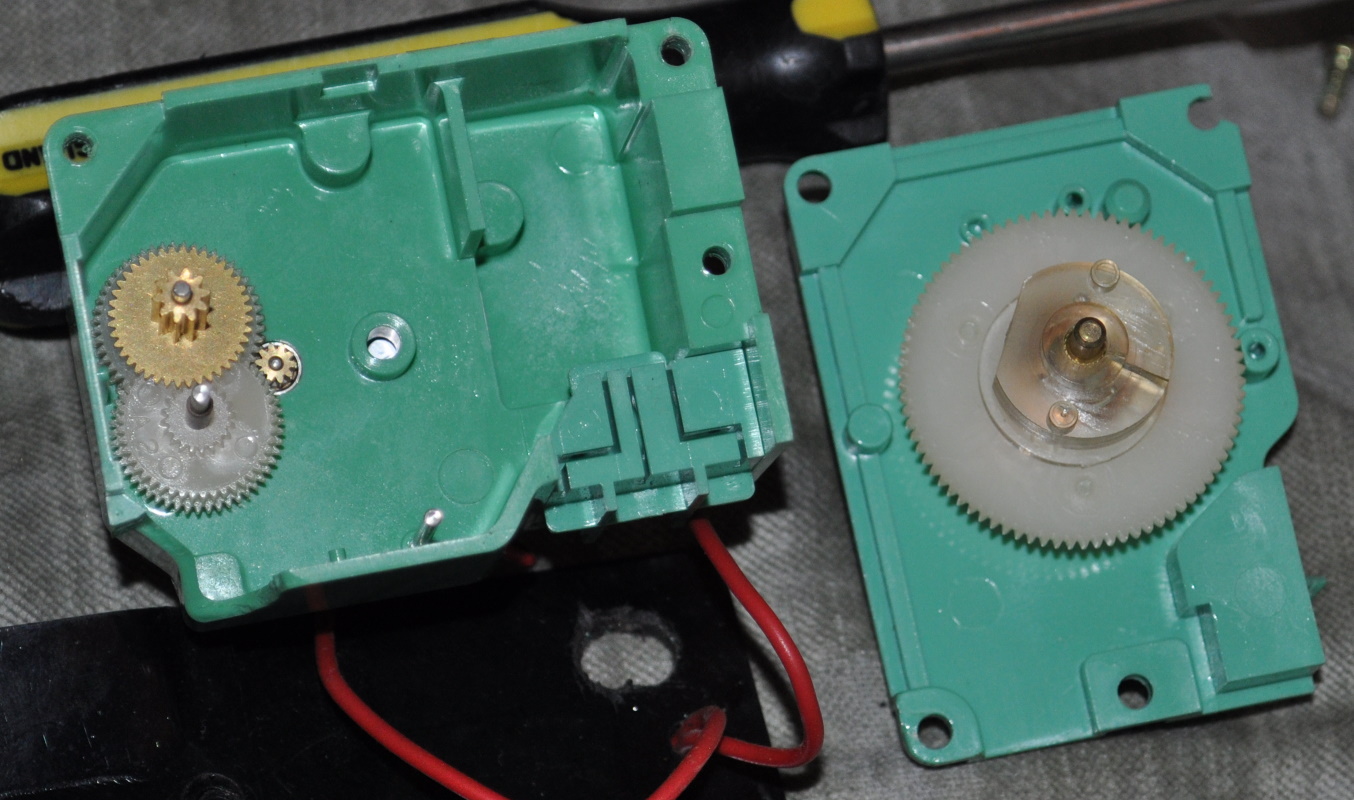
While the timing system did actually still work, you can see a fairly obvious problem, and when I was repairing it I found this likely broke when it was assembled – the brass spacers are too large to fit the recess in the plastic and exert a lot of outwards pressure on the casing. Which results in this:
As an aside this is how I dated the unit, the motor was likely made on the 28th of June 1972. Check out that RPM!
The bottom of the disc it turns, the ring scoring in the middle is caused by the sprung voltage connector which is why it becomes a 100v voltage source for the motor turning it.
Inside the motor gearbox we can see a couple of things – it’s a set of 5 gears dropping the ratio, with the smallest ones in brass to avoid breakage. The big gear it drives is attached to a clear plastic part molded to the drive shaft splines. It’s cracked with age but still strong & functional. I did manage to drop the gears all over the floor at one point, it was an interesting puzzle finding the right order again.
Our old friend Superglue to the rescue.
Given the shocks from the coin release snapping back into place and the general stress that corner has to take, I decided to reinforce it – superglue on some plastics can result in a somewhat weak join even if it’s the best option available. Step 1 scuff up the plastic and file down the glue edge.
Step 2 cut a piece of something stronger, scuff up the surface and use a light film of epoxy adhesive, then cover it including the edges. This will never snap again. Not pictured but I also did a few other spot repairs around cracks, this was the one needing a brace though.
So with that the entire coin operated part was fixed, but the Mahjong toy was still broken despite good 1.5v coming from the transformer. Repairs not shown but here’s the full set of dismantled parts. One ratchet was snapped, both small motor mounts were snapped, the lower case was cracked, both drum drive gears had cracked with age (initially I thought it had been reverse wired and broke itself but I’ve discounted that theory now). All basic fixes although the drive gears can’t really be repaired or sourced, the trick there is a small amount of thread lock on the axle. The motor was working but only if gently encouraged. Both button contacts needed cleaning and dropping some 3-in-1 oil onto both axle ends of the motor freed it up, then topped up with a droplet of sewing machine oil to smooth it out as it was running ‘loose’ due to bearing wear.
If you remember old buses, train timetables or maybe alarm clocks which had ‘flipping’ characters, those are known as a split-flap display. That’s how the drums in the toy work, but instead of having the top and bottom halves of letters across them, the flaps have tiles on one side and a traditional green table colour on the other. it took a very long time to clean all the flaps.
Pushing either button engages the motor and also lifts one side of the drive gear assembly so it engages with the left or right drum. It took a lot of fine tuning to get the larger one to run reliably, due to the weight of the drum, the slipping drive gear until I threadlocked it, and a spring which lives in the top casing to stop the flaps falling over unintentionally which was too strong. I clipped a 1.5v battery in the battery box for testing, on the bottom of the toy the TOMY logo is stamped which is how I found out who made the original toy. I even found an unmodified one on Yahoo a few days later, which I’ve bought in case spares are ever needed. It’s got to be just as rare as this bartop unit.
That was as clean as I could get it – the nicotine (which took an age to remove from the clear plastic cover and the TONY badge) wouldn’t shift without aggressive cleaners that also looked like they’d strip out the paint from the fake woodgrain. The badge was in a total state when I got it, bent & covered with glue residue.
So with all that done, the machine is now running again. I made a video so you can see how it’s operated, and how the internals work.


